English
 Lacrimosa is already shaping up to be one of the strongest Chaos DPS characters in Neverness to Everness, combining powerful Nightmare damage, flashy combos, and the unique ability to continue applying pressure even after leaving the field. Her mix of damage-over-time effects, enemy skill mimicry, and flexible melee and ranged combat makes her one of the most versatile carries currently available. In this Neverness to Everness Lacrimosa build guide, we'll cover her best Arcs, Cartridge setups, skill priorities, awakenings, and team compositions so you can build her correctly from day one.

Getting the most out of Lacrimosa requires more than just unlocking her—it also means consistently farming upgrade materials, optimizing gear, and refining team rotations over time. With OSLink, you can remotely play your Neverness to Everness PC session from your phone , making it easier to stay on top of daily farming, character progression, and team testing without needing to stay at your PC.
Lacrimosa Overview
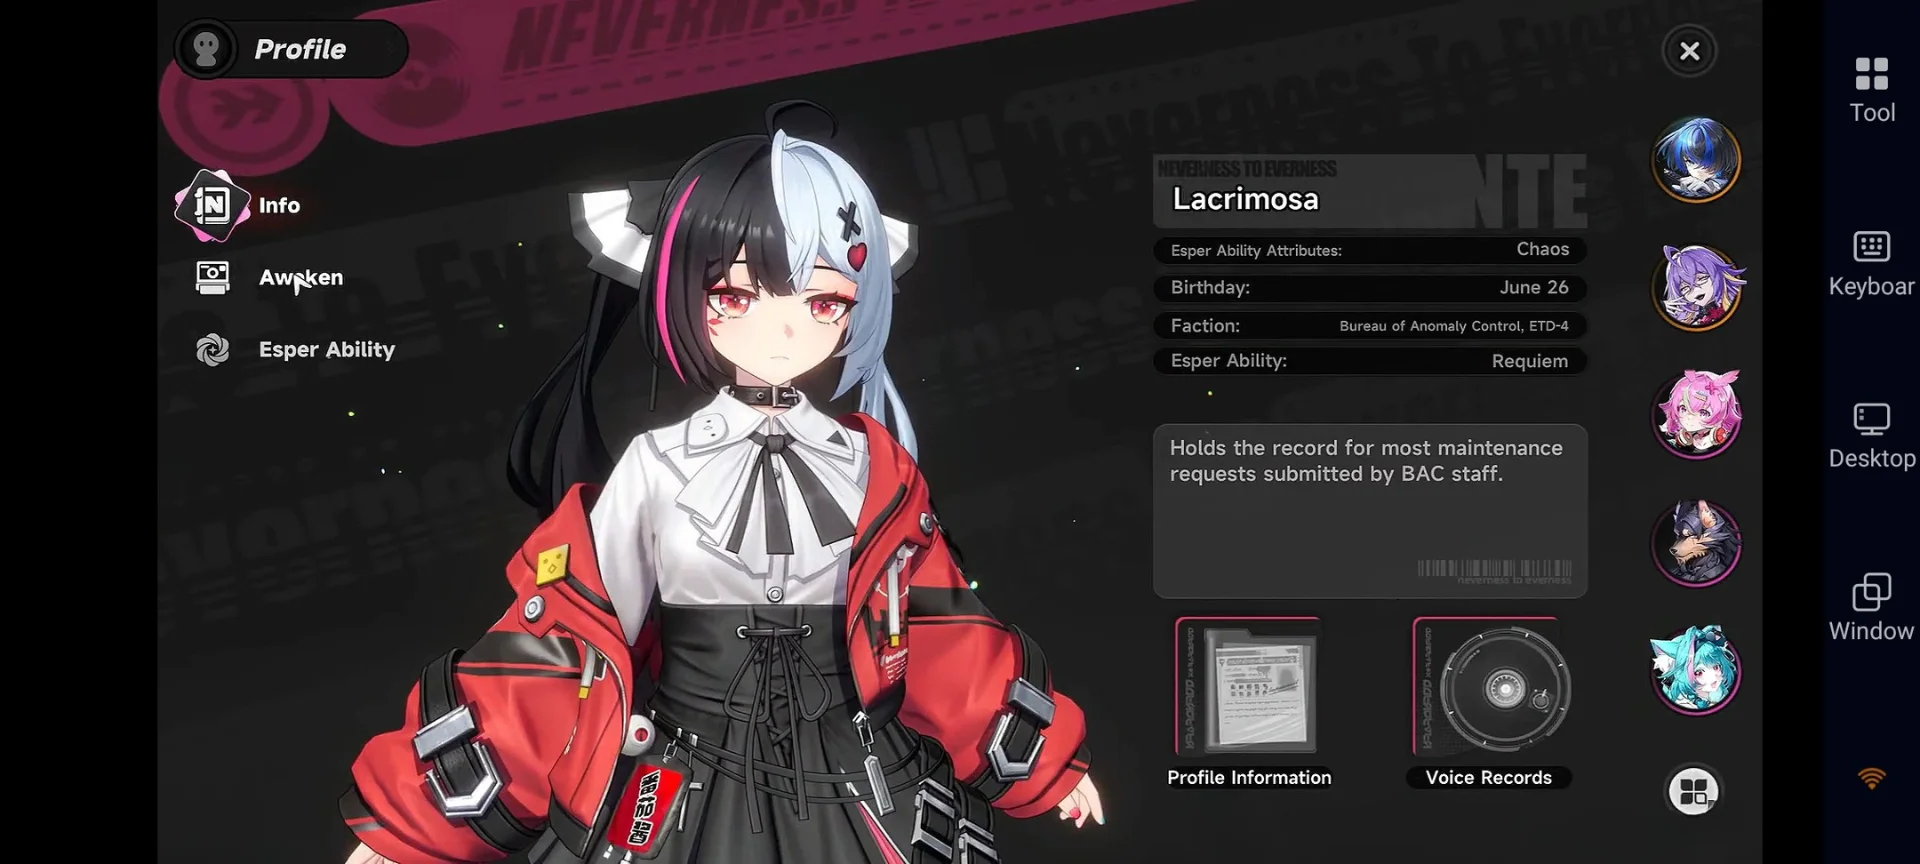
Lacrimosa is an S-Rank Chaos Liquid main carry and breaker in Neverness to Everness who specializes in damage-over-time stacking, enemy skill mimicry, and devastating Chaos burst transformations.
-
Role: On-Field Main DPS / Breaker
-
Element: Chaos
-
Arc Type: Liquid
-
Specialty: DoT Stacking, Enemy Skill Mimicry, Chaos Burst Transformation
-
Strength: High sustained damage, exceptional shield-breaking, and versatile combat adaptability
Lacrimosa features one of the most versatile playstyles in Neverness to Everness. Her attacks apply Nightmare stacks that deal Chaos damage over time, while her unique Skill Mimicry allows her to learn and use abilities from enemies and bosses. She can also switch between Melee and Ranged combat styles, giving her flexibility in different situations.
As Nightmare stacks build, Lacrimosa unlocks her enhanced Chaos Burst form, empowering her Skill and Ultimate with devastating burst damage. She works especially well with Scorch and Nova teammates, triggering powerful Discord reactions that further boost her damage output. Combined with strong shield-breaking, sustained DPS, and excellent exploration utility, Lacrimosa is an adaptable main carry capable of excelling in nearly any content.
Lacrimosa Skill Breakdown
Lacrimosa revolves around building Nightmare stacks and overwhelming enemies with sustained Chaos damage. Her kit combines flexible Melee and Ranged combat, powerful damage-over-time effects, and a unique ability to copy enemy skills.
Basic Attack – Sweet and Sour
Lacrimosa can freely switch between two combat modes, giving her more flexibility than most traditional DPS characters.
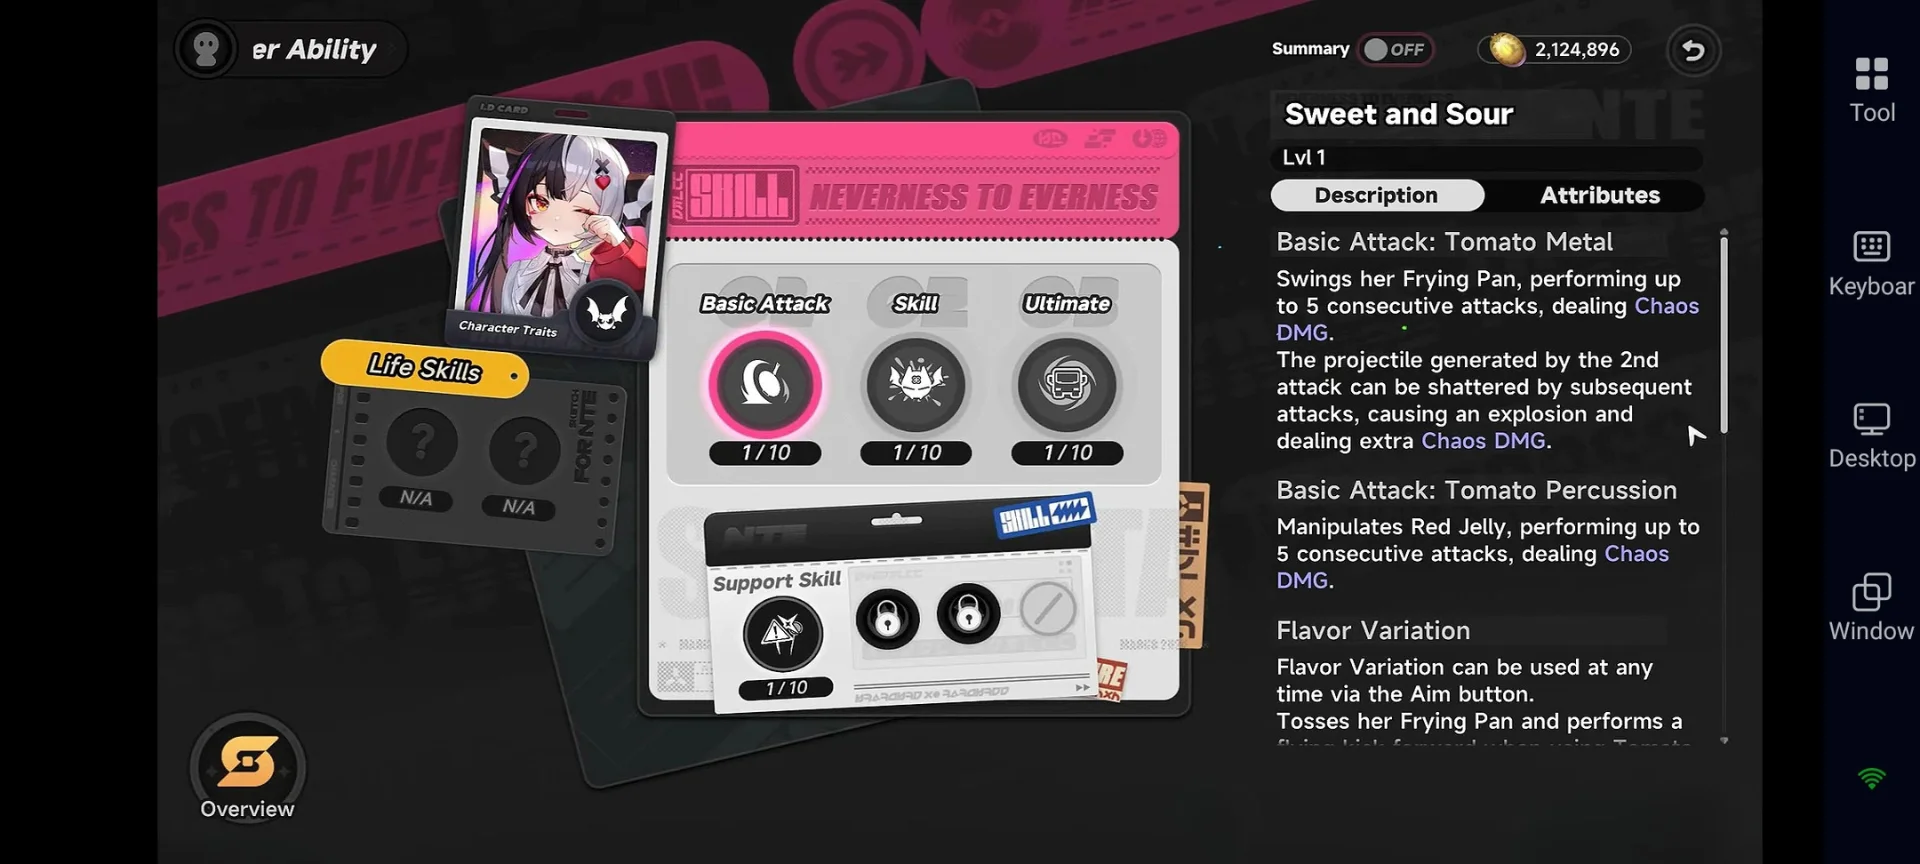
Tomato Metal (Melee Mode)
-
Uses her oversized frying pan to perform a fast 5-hit combo
-
Deals Chaos damage at close range
-
Ideal for aggressive on-field combat
Tomato Percussion (Ranged Mode)
-
Activated by holding the Aim button
-
Fires rapid jelly projectiles from a distance
-
Enables her Enemy Skill Copy mechanic
Regardless of which mode she uses, her attacks continuously apply Nightmare stacks to enemies. These stacks deal Chaos damage over time and form the foundation of her damage output.

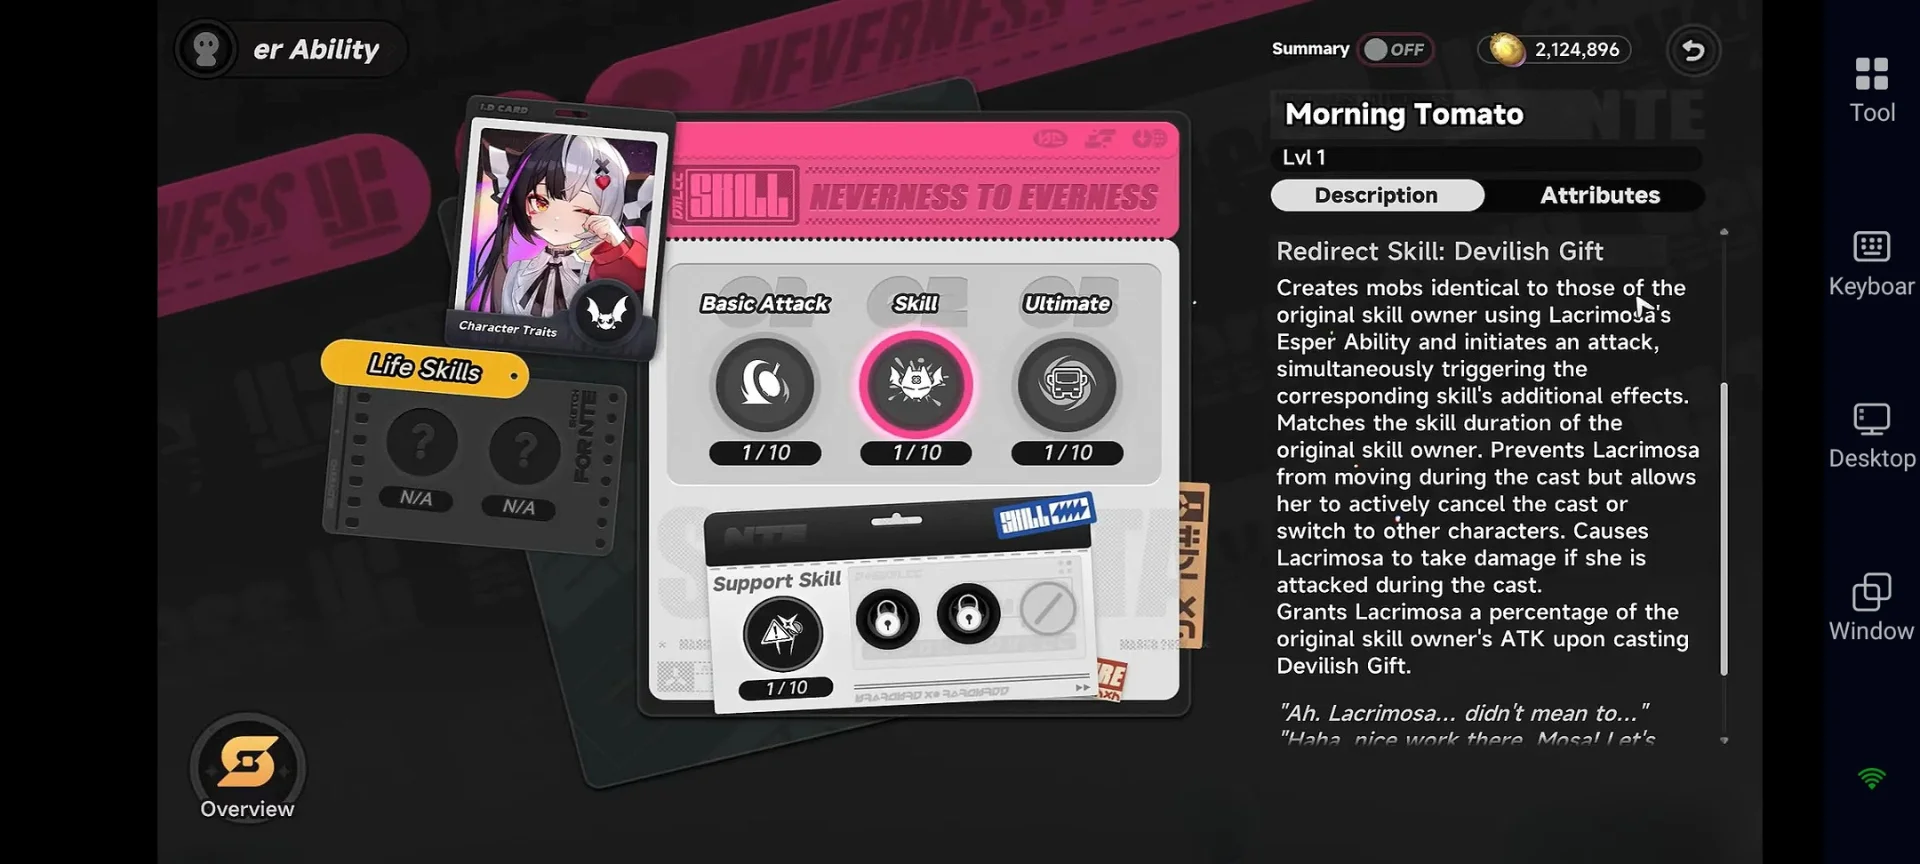
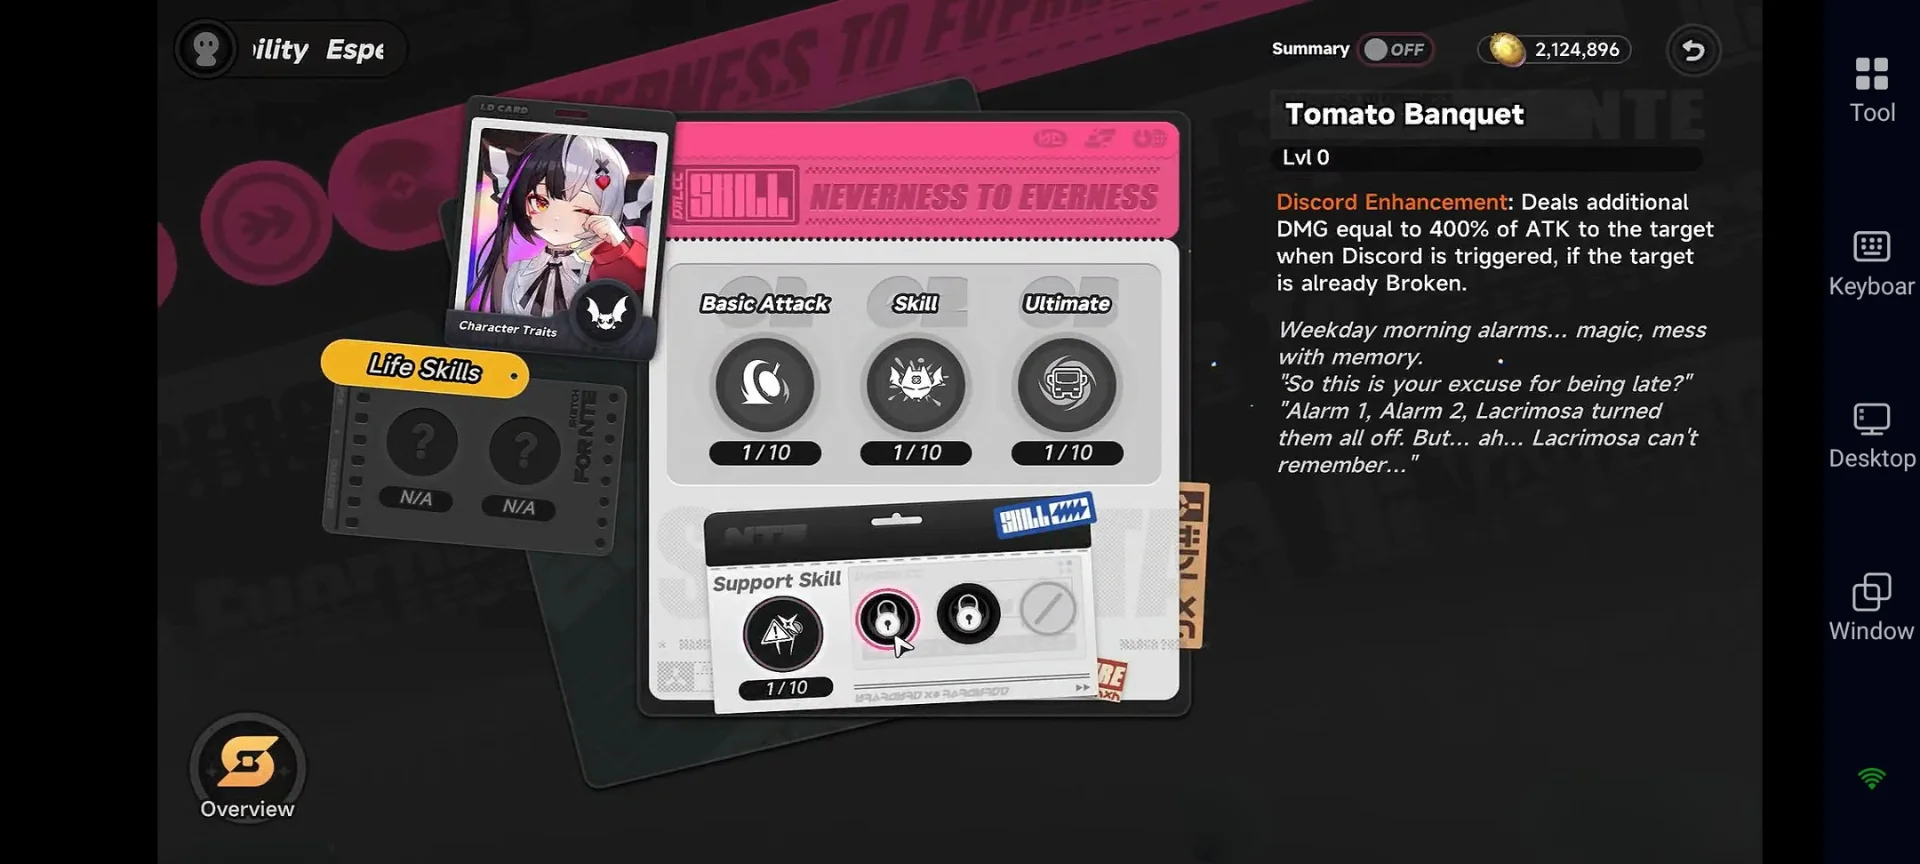
Skill – Morning Tomato
Morning Tomato is Lacrimosa's main setup tool and one of the fastest ways to build Nightmare stacks.
When activated:
-
Throws unfinished Esper constructs that explode on impact
-
Deals AoE Chaos damage
-
Applies multiple Nightmare stacks instantly
-
Can rapidly accelerate her damage buildup
One of the most unique aspects of this skill is its interaction with copied abilities.
If Lacrimosa has successfully copied an enemy skill:
-
Morning Tomato transforms into the copied ability
-
Gains access to additional effects depending on the enemy
-
Provides extra flexibility during combat
This allows Lacrimosa to adapt to different encounters while maintaining pressure through Nightmare application.
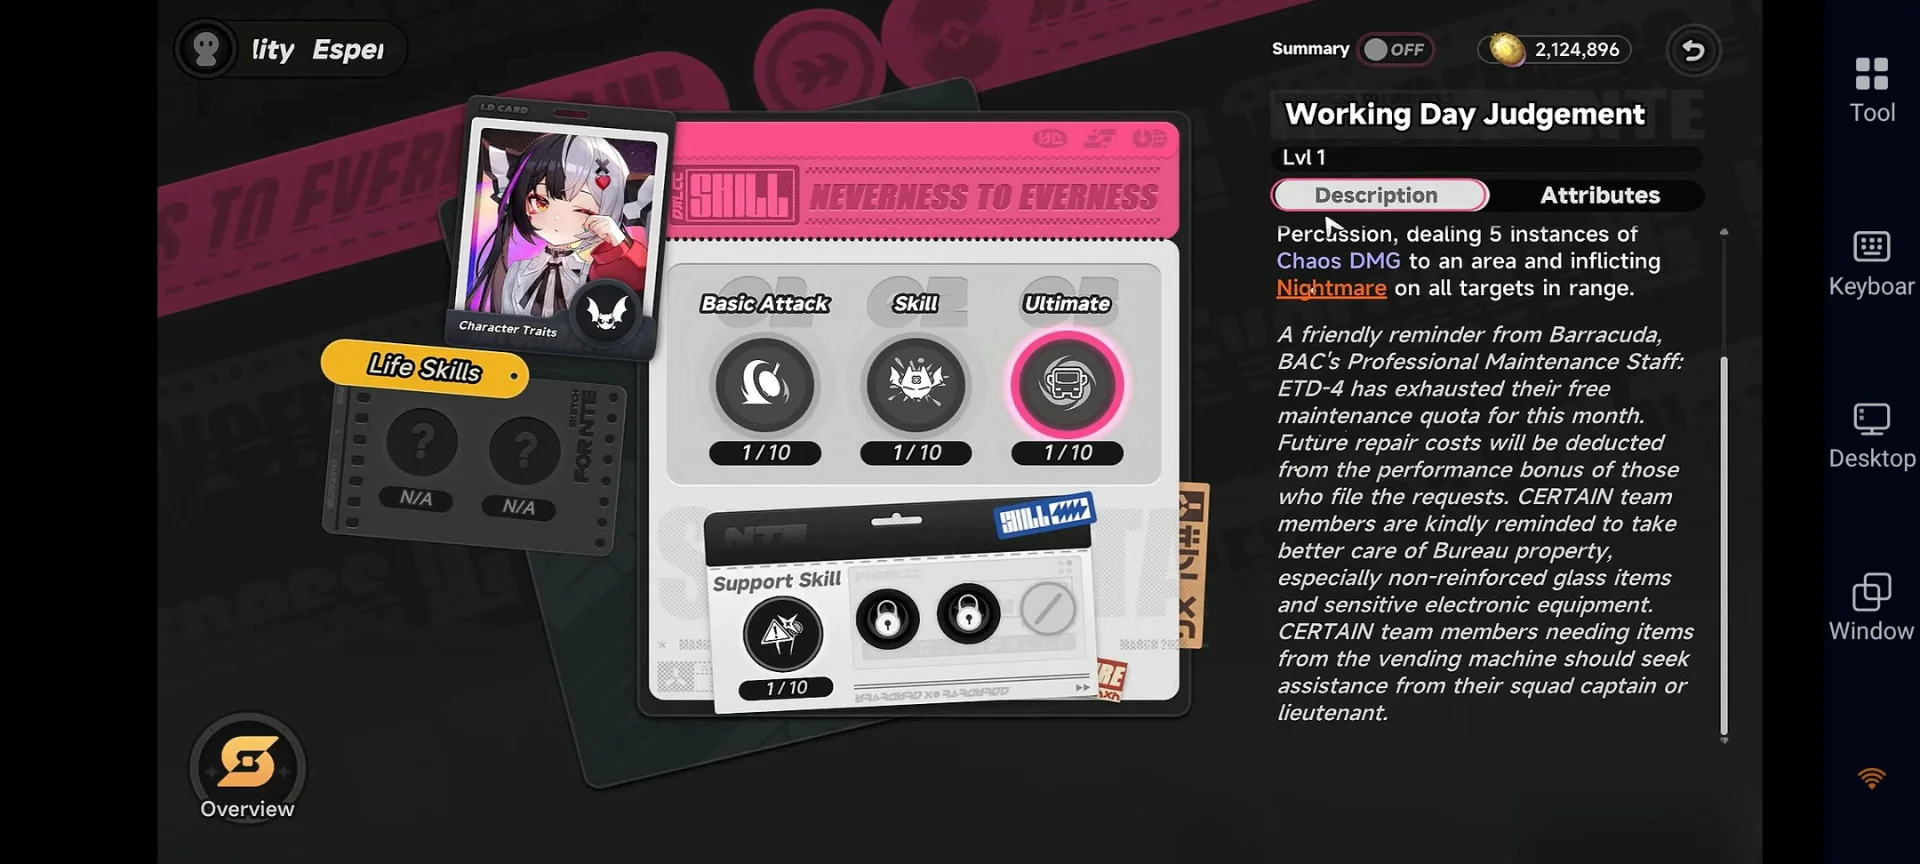
Ultimate – Working Day Judgement
Working Day Judgement is Lacrimosa's primary burst damage tool.
When activated:
-
Deals massive AoE Chaos damage
-
Applies additional Nightmare stacks
-
Creates powerful burst windows against bosses and elite enemies
The Ultimate's animation changes depending on her current combat form:
-
Melee Mode unleashes a heavy vehicle attack
-
Ranged Mode launches a different large-scale vehicle strike
Because Nightmare damage continues ticking after application, this Ultimate becomes significantly stronger when used against enemies already carrying multiple Nightmare stacks.

Support Skills and Passives
Lacrimosa's passive abilities further reinforce her role as a sustained damage dealer.
Nightmare Effect (Passive)
-
Most attacks apply Nightmare stacks
-
Nightmare continuously deals Chaos damage over time
-
Serves as the primary source of her sustained DPS
Since so much of her damage comes from Nightmare, keeping stacks active is essential for maximizing her performance.
Skill Upgrade Priority
For the best overall performance:
-
Ultimate (Working Day Judgement) – Main burst damage source
-
Skill (Morning Tomato) – Fast Nightmare application and copied skill utility
-
Basic Attack – Important for maintaining Nightmare stacks
-
Support Skill – Useful utility but lower overall impact
How to Play Lacrimosa (Simple Rotation)
Once you understand her mechanics, Lacrimosa follows a straightforward but rewarding gameplay loop:

-
Build Nightmare stacks with Basic Attacks
-
Use Morning Tomato to rapidly increase stack count
-
Copy powerful enemy skills whenever possible
-
Continue attacking to maintain maximum Nightmare uptime
-
Use Working Day Judgement during high-stack windows
-
Repeat while keeping pressure on the enemy
The key to mastering Lacrimosa is maintaining Nightmare stacks as consistently as possible. Her damage scales heavily with stack uptime, and proper use of copied skills can further increase her effectiveness in both boss fights and open-world combat.
Lacrimosa Awakenings and Resonance
Lacrimosa’s Awakenings are all about pushing her Chaos damage higher, improving Nightmare uptime, and making her burst windows much stronger. In a full Lacrimosa build, these upgrades matter a lot because her damage mainly comes from stacking effects over time instead of single hits. The more you improve her Awakenings, the smoother her gameplay feels.
|
Awakening |
Effect |
Why It Matters |
|
A1 – Clock Out Clemency
|
Increases Nightmare DMG Ratio by 50%. |
Strong early boost that directly improves her core DoT damage. Excellent for any build. |
|
A2 – Rise and Shine
|
Increases Lacrimosa’s damage dealt by 15% for 15s when she switches in using her Support Skill. |
Helps smooth out rotations and adds extra burst during combos. |
|
A3 – Molten Ice Cream
|
Triggers all accumulated Nightmare effects on the target at once when the 5th hit of Tomato Metal or Tomato Percussion lands. |
Makes Nightmare stacking much more explosive and stable for sustained fights. Big damage spike on Basic Attack combos. |
|
A4 – Almighty Lord of Tomatoes
|
Extends Nightmare duration to 6 seconds. |
Massive power spike. Effectively doubles total DoT damage by increasing uptime. |
|
A5 – Tempered Glass Judgement
|
Prevents Nightmare stacks from being removed when the target is healed. Also reduces the target’s Max HP by 200% of the damage of a single Nightmare instance. |
Very strong for boss fights and high-end content. Improves consistency and adds extra utility. |
|
A6 – Morning Spell
|
Allows Lacrimosa to automatically cast her Support Skill (Devilish Gift / Microwake) and trigger the corresponding Cycle reaction without needing Cycle Energy when swapping to her from a Nova, Scorch, or Discord trigger within 5s. |
Biggest upgrade in the kit. Unlocks full team synergy, smoother rotations, and significantly better overall scaling. |


Awakening Priority
For most players building a strong Neverness to Everness Lacrimosa build, focus on:
A6 → A4 → A1 → A5 → A2 → A3
-
A6 is the biggest upgrade and changes how Lacrimosa gameplay feels
-
A4 massively increases Nightmare uptime and total damage
-
A1 boosts early damage scaling in any build
-
A5 is best for long boss fights and endgame content
-
A2 + A3 are more situational but still useful


 AFK Anywhere, Progress Anytime

Lacrimosa Resonances
|
Resonance |
Effect |
Why It Matters |
|
Eternity Shattered (3 Awakenings) |
+1 level to Basic Attack, Skill, and Ultimate |
Small but steady scaling boost for your Neverness to Everness Lacrimosa build |
|
The Ultimate Treasure of Clear Understanding (6 Awakenings) |
Grants all team members 20% ATK while Lacrimosa is active |
Strong team-wide buff that improves overall damage and supports her hybrid DPS role |
Lacrimosa Best Arcs (Weapons)
When building a strong Neverness to Everness Lacrimosa build, your Arc choice is extremely important because it directly boosts her Chaos damage, Nightmare scaling, and burst windows. Unlike simple DPS characters, Lacrimosa gameplay benefits a lot from a mix of sustained damage and burst amplification, so the right Arc can significantly improve her overall performance.
|
Arc |
Effect |
Why It Matters |
|
The Last Rose (Signature Arc)
|
Grants Chaos Taunt stacks whenever DoT damage is dealt while also providing CRIT Rate, ATK, and CRIT DMG bonuses. |
Complements Lacrimosa's Nightmare playstyle since she constantly applies DoT effects. The additional offensive stats significantly boost both her sustained damage and burst potential, making it her best-in-slot Arc. |
|
Fluff of Fleetness (Alternative Arc)
|
Grants ATK stacking and CRIT DMG while staying on-field |
Strong DPS option that fits aggressive Lacrimosa gameplay, especially for sustained fights |
|
Shiny Days (Budget Option)
|
Provides ATK boost and bonus damage against weakened enemies |
Best early-game choice for a starter Lacrimosa build |


Recommended Lacrimosa Cartridge / Modules
For Lacrimosa, your Lacrimosa Cartridge / Modules setup should focus on boosting Chaos damage, Nightmare scaling, and DEF penetration effects. Since her kit is heavily tied to DoT stacking and burst windows, proper module optimization makes a huge difference in her overall performance.
Best Cartridge Setup:
|
Cartridge |
Effect |
Why It Matters |
|
Diabolos Set
|
Increases Chaos DMG and reduces enemy Chaos RES |
Best overall choice for Lacrimosa. Perfect synergy with Nightmare stacking and sustained DPS |

Set Bonuses:
-
2-Piece: Chaos DMG +10%
-
4-Piece: Ignores enemy Chaos RES after reactions or burst triggers
Recommended Module Stats
To fully optimize your Lacrimosa build:
Main Stats:
-
ATK%
-
Chaos DMG
-
CRIT Rate
-
CRIT DMG
Substats Priority:
-
ATK%
-
Universal DMG Bonus
-
CRIT Rate
-
CRIT DMG
-
Flat ATK
Recommended Teams for Lacrimosa
Lacrimosa is a high-impact Chaos DPS who shines in reaction-heavy teams built around Scorch, Nova, and Discord mechanics. Her gameplay focuses on stacking Nightmare DoT, breaking enemies, and triggering huge burst windows through her passive damage effects.
elow are the strongest teams you can build around a full Neverness to Everness Lacrimosa build.
Premium Hyper Discord Team (Best Overall)
This is Lacrimosa’s strongest team for boss fights and endgame content. It focuses on fast breaking, reaction chaining, and maximizing her Nightmare burst windows through Discord triggers.
|
Character |
Role |
Why They Work Well |
|
Lacrimosa
|
Main DPS |
Core Chaos carry. Deals massive Nightmare DoT and burst damage |
|
Daffodill
|
Breaker |
Enables Broken state to trigger Discord and unlock Lacrimosa burst potential |
|
Sakiri
|
Support / DoT Buffer |
Boosts Scorch damage and increases overall Chaos DPS |
|
Fadia
|
Nova Support / Utility |
Provides shielding, support buffs, and reaction setup |


Why this team works:
-
Strong Scorch + Nova → Discord reaction cycle
-
Fast enemy break uptime for burst windows
-
High synergy with Nightmare stacking
-
Excellent for bosses and late-game fights
-
Very stable damage output across rotations
Full Cycle Burst Team (Meta Boss Killer)
This Lacrimosa team is built for consistent high DPS rotations with strong support cycling and heavy burst windows.
|
Character |
Role |
Why They Work Well |
|
Lacrimosa
|
Main DPS |
Core damage dealer with Nightmare stacking |
|
Baicang
|
Scorch Enabler / Support |
Provides ATK buffs, swap synergy, and Chaos pressure |
|
Daffodill
|
Breaker |
Enables Discord triggers and fast enemy breaks |
|
Haniel
|
Buffer / Healer |
Stabilizes team and boosts overall damage output |


Why this team works:
-
Strong buff cycling for sustained DPS
-
Excellent break + Discord synergy
-
Baicang adds flexible swap mechanics
-
Great for both bosses and extended fights
-
High consistency in damage uptime
Should You Pull Lacrimosa?
Lacrimosa is a really strong pick if you like Chaos DPS characters with DoT damage. She hits hard, stacks Nightmare effects, and keeps dealing damage even when she is off-field. In a solid Neverness to Everness Lacrimosa build, she can carry fights with steady damage and big burst moments, especially in reaction teams.
If you enjoy simple burst characters, she may take some time to master because Lacrimosa gameplay is all about stacking effects and timing your skills. But if you like learning a character and seeing your damage grow over time, she's definitely worth pulling and building.
Conclusion
Lacrimosa has all the tools needed to become a top-tier Chaos DPS in Neverness to Everness, offering strong Nightmare damage, excellent reaction synergy, and flexible gameplay through her unique skill-copying mechanics. With the right Arcs, Cartridge setup, and team composition, she can dominate both extended fights and burst-focused encounters while remaining effective across a wide range of content. As you continue farming upgrades, optimizing builds, and refining your rotations, OSLink lets you remotely access your Neverness to Everness PC session from your phone, giving you a more flexible way to keep progressing and improving your Lacrimosa build over time.
 Download