English
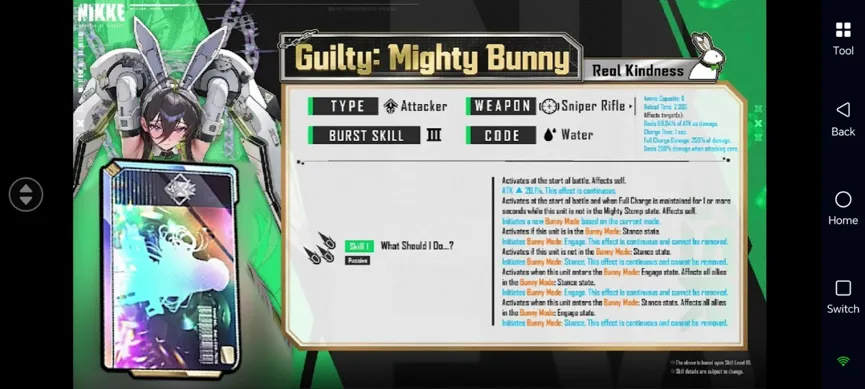
GODDESS OF VICTORY: NIKKE Guilty: Mighty Bunny is an SSR Water-code Burst III Attacker from Missilis who uses the Rumble Stomper Sniper Rifle. Her kit revolves around switching between two Bunny Modes, giving her access to either strong conventional charged damage or True Damage depending on the situation.
This Guilty: Mighty Bunny build guide focuses on her role, skills, best builds, Harmony Cube choices, team options, gameplay, and pull advice. She is mainly designed for single-target encounters, so players looking for another boss-focused DPS may find plenty of value in her kit.
Building a new Nikke usually means spending plenty of time on daily stages, event farming, equipment materials, and other progression resources. If you manage multiple accounts or want to keep farming without constantly watching the game, OSLink can help with multi-instance setups and AFK progression. You can keep different accounts running, handle repetitive farming more efficiently, and gather the resources needed for Guilty: Mighty Bunny build without repeatedly switching between clients.
Guilty: Mighty Bunny Stats and Role
The Guilty: Mighty Bunny role is primarily single-target Burst III DPS. She relies on charged Sniper Rifle shots and powerful Burst damage rather than wide AoE attacks.
|
Stat |
Details |
|
Rarity |
SSR |
|
Code |
Water |
|
Class |
Attacker |
|
Burst |
Burst III |
|
Weapon |
Sniper Rifle |
|
Ammo |
6 |
|
Reload Time |
2.00 sec |
|
Charge Time |
1 sec |
|
Full Charge Damage |
250% |
|
Burst Cooldown |
40 sec |
Her normal attack deals 69.04% ATK, while Full Charge attacks receive the standard Sniper Rifle charge multiplier. Because she only has six rounds before reloading, ammo efficiency and reload speed also matter when planning Guilty: Mighty Bunny build.
She performs best when fighting bosses or tougher single targets. Her lack of meaningful AoE makes her less effective in stages filled with large groups of weaker enemies.

Guilty: Mighty Bunny Skill Breakdown
Understanding each Guilty: Mighty Bunny skill is important because her damage pattern changes depending on her current Bunny Mode.
|
Skill |
Main Effect |
|
Skill 1 – What Should I Do...?
|
Grants ATK and controls Bunny Mode switching |
|
Skill 2 – Can I Take These Off...?
|
Provides different offensive effects in Stance and Engage |
|
Burst – I'm Finally Free...!
|
Changes her weapon into Mighty Stomp for a powerful charged attack |



In Bunny Mode: Stance, Guilty gains additional Attack Damage and Charge Damage. Full Charge hits also trigger extra damage, making this mode suited to conventional charged-shot DPS.
In Bunny Mode: Engage, her normal attacks and Mighty Stomp deal True Damage instead. Full Charge hits also trigger additional True Damage, making Engage particularly valuable against enemies whose DEF is worth bypassing.
When Mighty Stomp is not active, holding a fully charged shot long enough allows Guilty to switch between the two Bunny Modes.
Her Burst changes her weapon into Mighty Stomp, giving her one extremely powerful charged attack while also boosting Charge Damage and Attack Damage. This creates a very burst-heavy damage profile focused on landing strong single-target hits.
Guilty: Mighty Bunny Best Builds
The Guilty: Mighty Bunny best builds focus most of their investment on Skill 2 and Burst.
|
Build Area |
Recommendation |
|
Early Skill Target |
4/7/7 |
|
Endgame Skill Target |
4/10/10 |
|
Skill Priority |
Skill 2 > Burst > Skill 1 |
|
Overload Priority |
ATK > Elemental Damage > Charge Speed |
|
Doll |
High-level SR Doll |
Skill 1 mainly provides a permanent ATK increase and handles her Bunny Mode mechanics, but Skill 2 and Burst contribute much more directly to her overall damage.
For Overload Gear, ATK and Elemental Damage are the most reliable priorities. Both improve her damage regardless of which Bunny Mode you use.
Charge Speed is another useful secondary stat because Guilty relies heavily on Full Charge attacks. A smoother charging rhythm can also make manual stance switching easier during Guilty: Mighty Bunny gameplay.


 AFK Anywhere, Progress Anytime

Guilty: Mighty Bunny Harmony Cube
For most players, the safest Guilty: Mighty Bunny harmony cube is the Resilience Cube.

Guilty only carries six rounds and has a two-second reload time, so Reload Speed helps reduce downtime between attacks. This is useful in longer boss fights where repeated reloads can noticeably interrupt her damage cycle.
The Destruction Cube can also be considered when fighting bosses with important destructible parts, especially if your equipment already solves most of Guilty's reload issues.

For general use, however, Resilience remains the easier option to slot into most Guilty builds.
Best Guilty: Mighty Bunny Team
A Guilty: Mighty Bunny team works best when it can strengthen either her raw attack damage or her True Damage setup.
|
Slot |
Character |
Role |
|
B1 |
Liter
|
ATK support and general utility |
|
B2 |
Takina
|
True Damage-oriented support |
|
B3 |
Guilty: Mighty Bunny
|
Main single-target DPS |
|
Flex |
Flora with Favorite Item
|
Additional support and synergy |
|
B3 |
Sin: Swift Bunny
|
Bunny Mode synergy |





The most interesting synergy is with Sin: Swift Bunny, because Guilty can synchronize Bunny Mode changes with allies that use the same mechanic.
This gives the two characters direct mechanical interaction rather than simply placing two strong DPS units on the same team.
Guilty can still work without the complete Bunny setup, but her Engage-focused True Damage performance becomes more attractive when paired with characters that directly support that damage type.
Guilty: Mighty Bunny Gameplay
Guilty: Mighty Bunny gameplay rewards manual control.
Use Stance when you want strong conventional charged attacks and are benefiting from normal ATK or damage buffs. Switch to Engage when True Damage becomes more valuable, especially against high-DEF enemies or in teams specifically built around True Damage.
You should also pay attention to when you activate Burst. Mighty Stomp is designed around one very powerful charged hit, so landing it during important boss damage windows is more valuable than simply using it without planning.
Because Guilty lacks strong AoE, she is generally more comfortable in boss-focused modes than in stages dominated by large enemy waves.
Pull Advice: Should You Pull Guilty: Mighty Bunny?
Guilty: Mighty Bunny is not a limited Nikke, which is one of the most important details when deciding whether to spend Gems on her banner.
She is a stronger pull if you already have characters such as Takina or Flora with Favorite Item, want another Water boss DPS, or enjoy manually controlling charged attackers and stance-based mechanics.
Players with limited Gems or incomplete True Damage support do not have the same pressure to pull immediately. Since Guilty is expected to enter regular recruitment options later, skipping her rate-up does not necessarily mean losing access to her permanently.
Overall, Guilty: Mighty Bunny is a specialized single-target attacker with an interesting two-mode system. Prioritize Skill 2 and Burst, build ATK and Elemental Damage first, use the Resilience Cube as the safe general choice, and place her in a team that can strengthen either her conventional charged damage or her Engage-based True Damage. Since raising her still requires a steady supply of upgrade materials and daily resources, OSLink can also be useful for multi-account management and AFK farming, helping you keep resource collection moving while spending less time manually switching accounts or repeating routine stages.
 Download