English
The Blood of Dawnwalker Swordmastery is a great choice if you enjoy fast sword combat, precise timing, and turning enemy attacks into opportunities for powerful counterattacks. The build revolves around Perfect Blocks, Stamina management, Activation Charge generation, and weapon damage, letting you stay aggressive without constantly attacking. With the right Perks, smart skill selection, and gear, Coen can turn successful defenses into a steady cycle of openings, counters, and powerful attacks.

In this The Blood of Dawnwalker Swordmaster build guide, we'll focus on the key choices that make this playstyle work, from the core Swordmastery setup to the Perks, weapons, and stats that strengthen it. As you progress and become more comfortable with Perfect Blocks and counterattacks, OSLink lets you remotely play your The Blood of Dawnwalker PC session directly from your mobile, giving you a convenient way to keep practicing your timing, refining your build, and taking Coen into more fights even when you're away from your PC.
Best Swordmaster Build in The Blood of Dawnwalker
The best Swordmaster build in The Blood of Dawnwalker focuses on Perfect Blocks, Activation Charge generation, and weapon damage. Instead of investing heavily into Vampirism or Witchcraft, you build around the Swordmastery tree and use a small number of abilities from other skill trees when they provide useful utility.
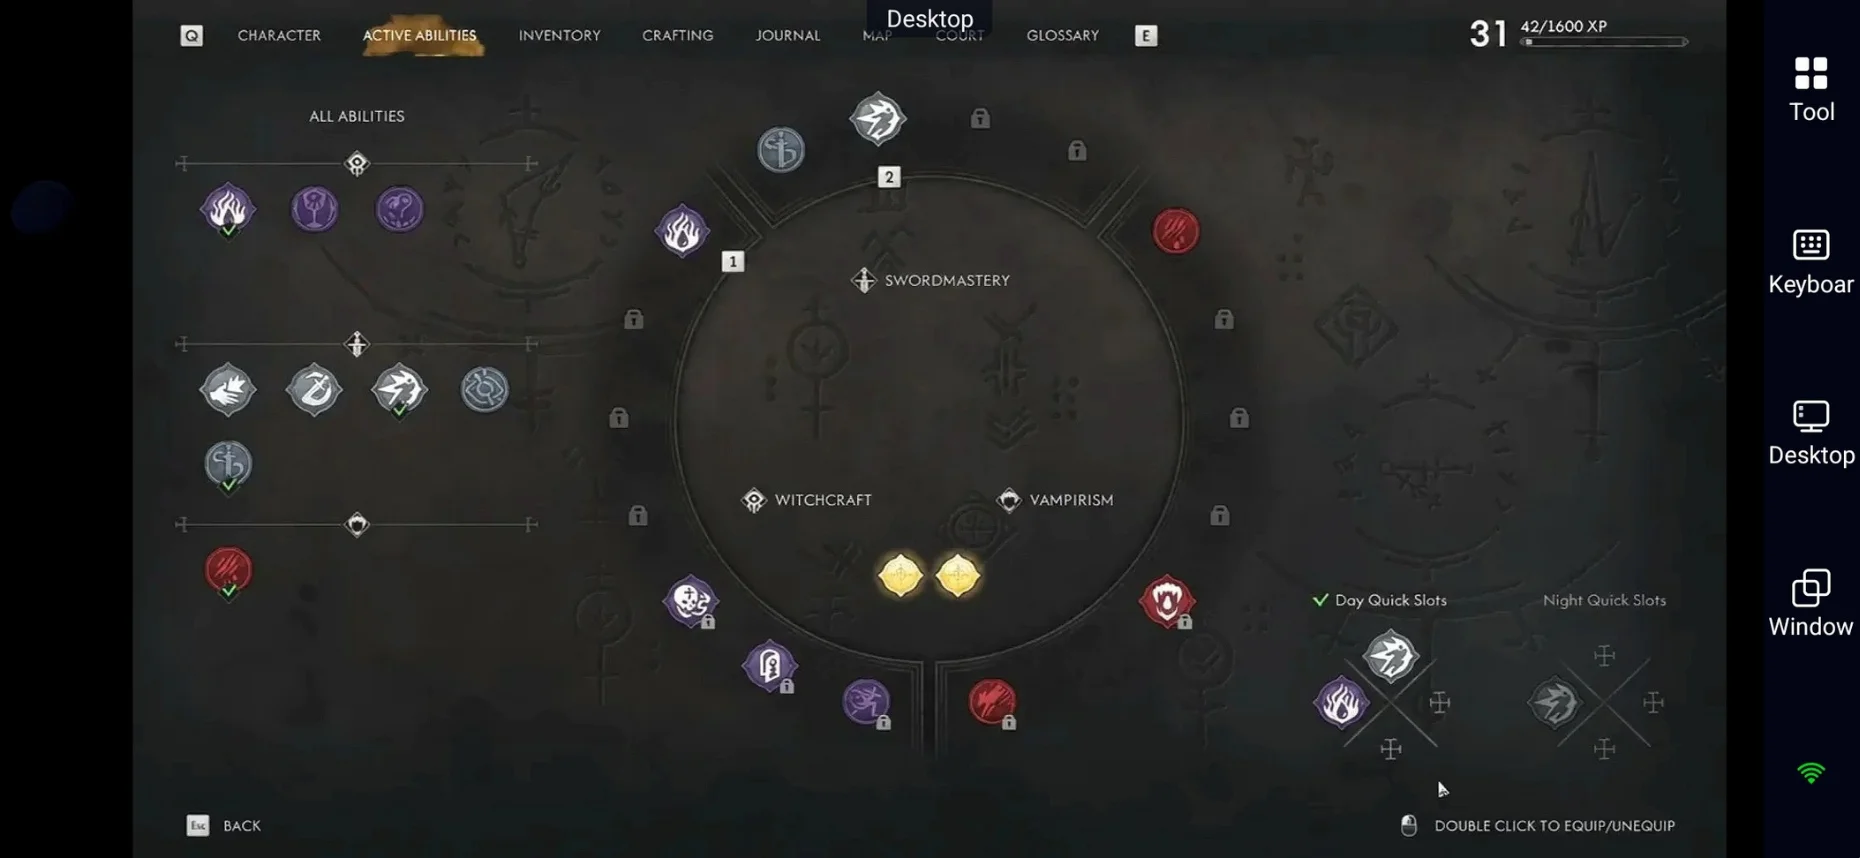
Swordmastery is particularly effective for Dawnwalker beginners because it remains useful throughout both day and night. Your sword remains the core of your combat style after sunset, while abilities such as Shadowstep or Voracious Bite can be added when you need extra mobility, healing, or other utility.
For the core of the build, prioritize:
-
Main Tree: Swordmastery
-
Main Weapon: Sword or Longsword
-
Primary Focus: Perfect Blocks and weapon damage
-
Secondary Focus: Activation Charge restoration
-
Best Ultimate: Sword Sage
-
Core Damage Ability: Artery Strike
-
Core Passive: Adrenaline Rush
-
Core Combat Mechanic: Perfect Block
-
Playstyle: Aggressive defensive dueling
The strength of this build comes from turning successful defense into offense. Perfect Blocks create openings while restoring Stamina and Activation Charges, allowing you to follow up with stronger attacks and abilities. Counterattack and Perfect Riposte further reward well-timed defenses, while Swiftness and Adrenaline Rush help increase your damage and maintain your Ability rotation.
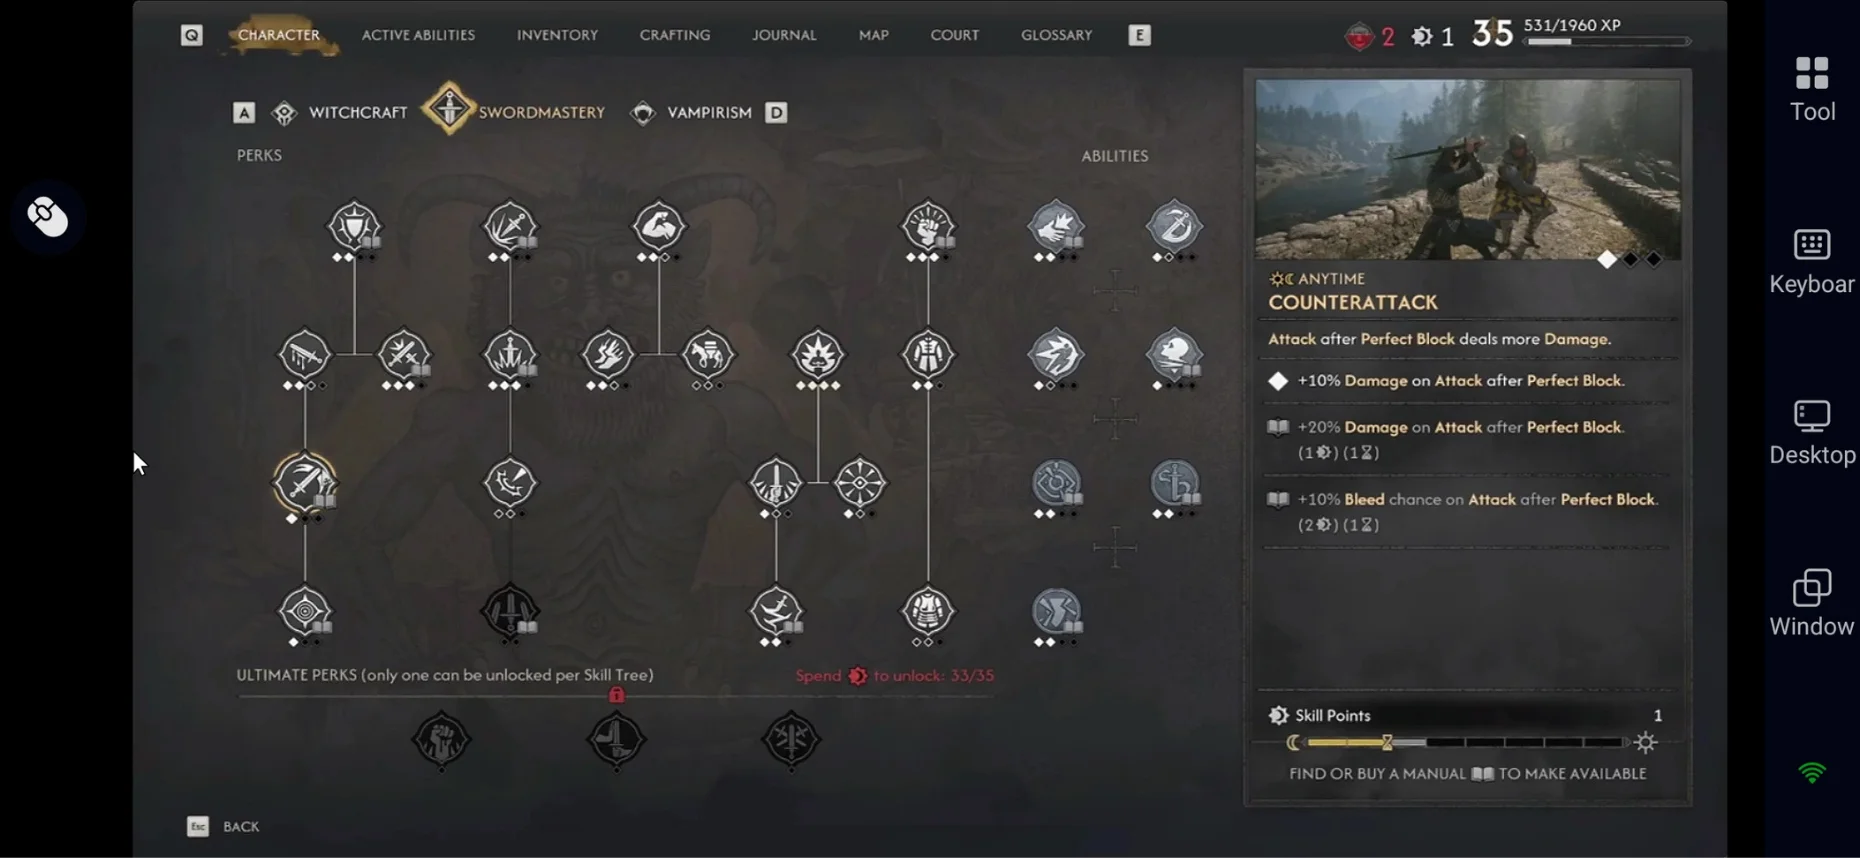
The result is a Swordmaster build that can stay aggressive without constantly attacking. Instead, you react to enemy attacks, Perfect Block at the right moment, regain resources, and immediately turn those openings into powerful counterattacks.
Best Swordmastery Abilities
The strongest Swordmaster build combines Perfect Blocks, Activation Charge generation, and weapon damage. Your core abilities should support that loop rather than simply adding more damage.
For the main Swordmaster setup, prioritize:
-
Artery Strike – Your main weapon-based finisher and one of the strongest offensive abilities for a traditional sword build.
-
Adrenaline Rush – Increases your damage while improving Activation Charge regeneration.
-
Swiftness – Rewards Perfect Blocks with increased Attack Speed and improves Critical Hit Chance.
-
Walking Fortress – Restores Activation Charges after Perfect Blocks and helps reduce Ability cooldowns.
-
Perfect Block – The foundation of the build, allowing you to defend, restore resources, and create openings for counterattacks.
You can then add Dirty Trick or Charge depending on how you prefer to approach fights. Broad Swing is another useful option when you need additional area damage against groups of enemies.
Artery Strike
Artery Strike is the main damage ability for a traditional Swordmaster build. Its powerful neck strike can instantly kill or decapitate vulnerable enemies, making it an excellent finisher once you have created an opening.
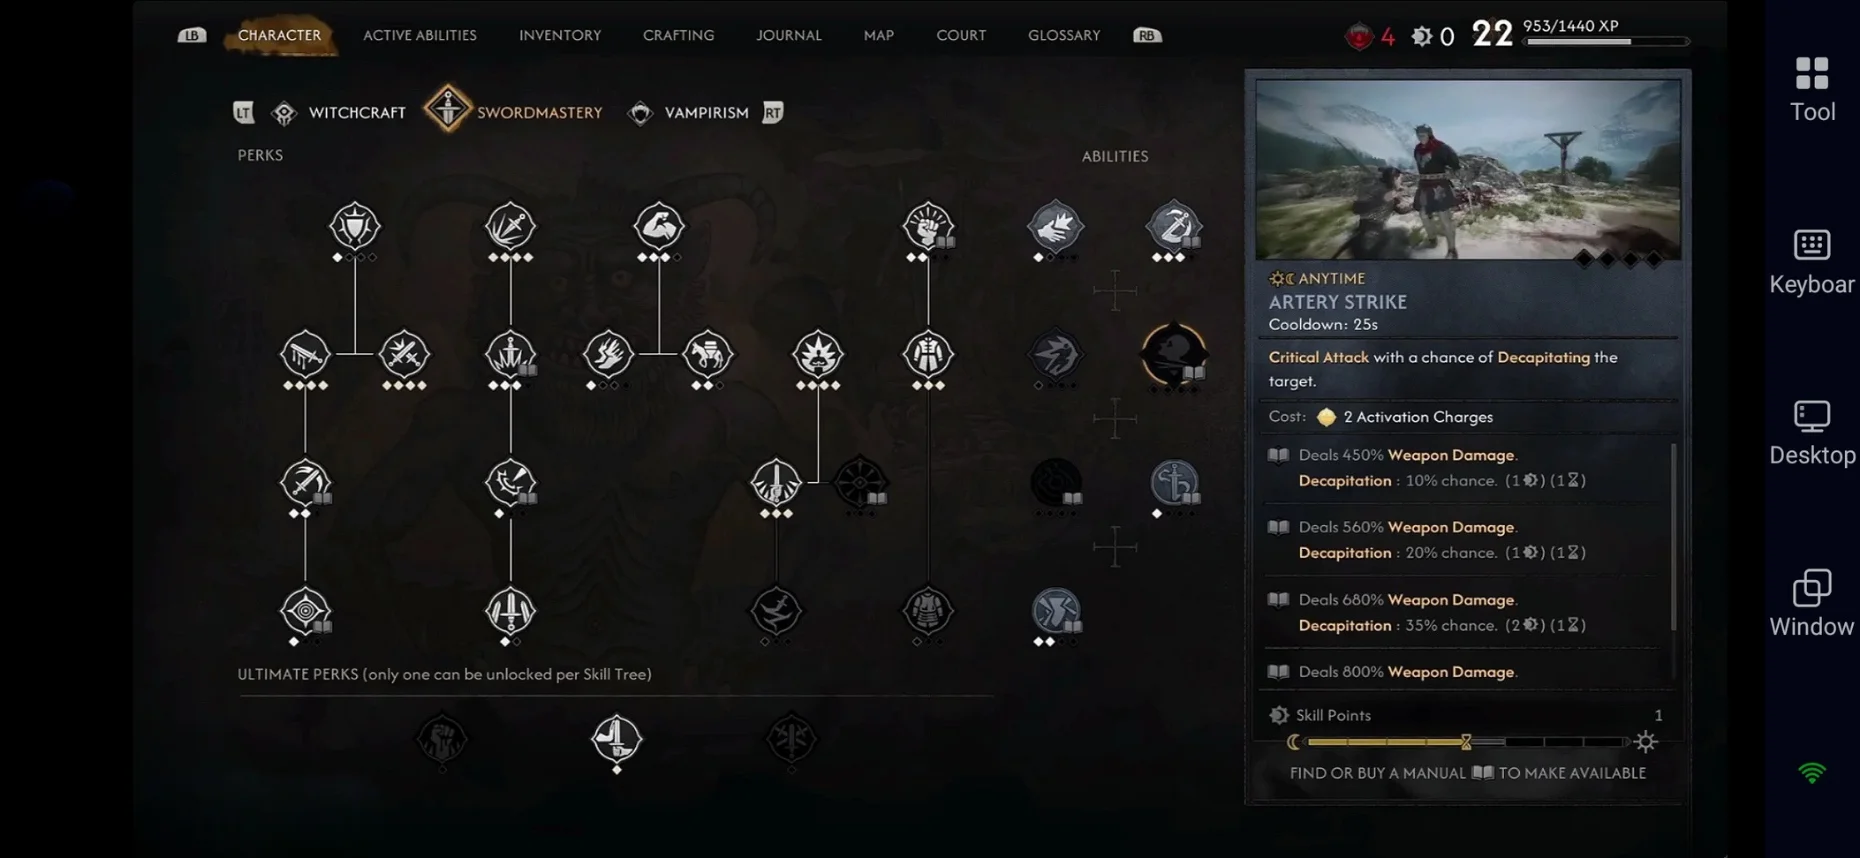
For a late-game Swordmaster setup, Artery Strike should be one of your highest priorities. Investing several levels into the ability gives you a powerful finisher that fits naturally into the build's Perfect Block and counterattack playstyle.
Adrenaline Rush
Adrenaline Rush is one of the most important passives for this build because it improves both damage and Activation Charge regeneration. Since Swordmastery relies heavily on Active Abilities, generating Charges consistently allows you to maintain your offensive rotation for longer fights.
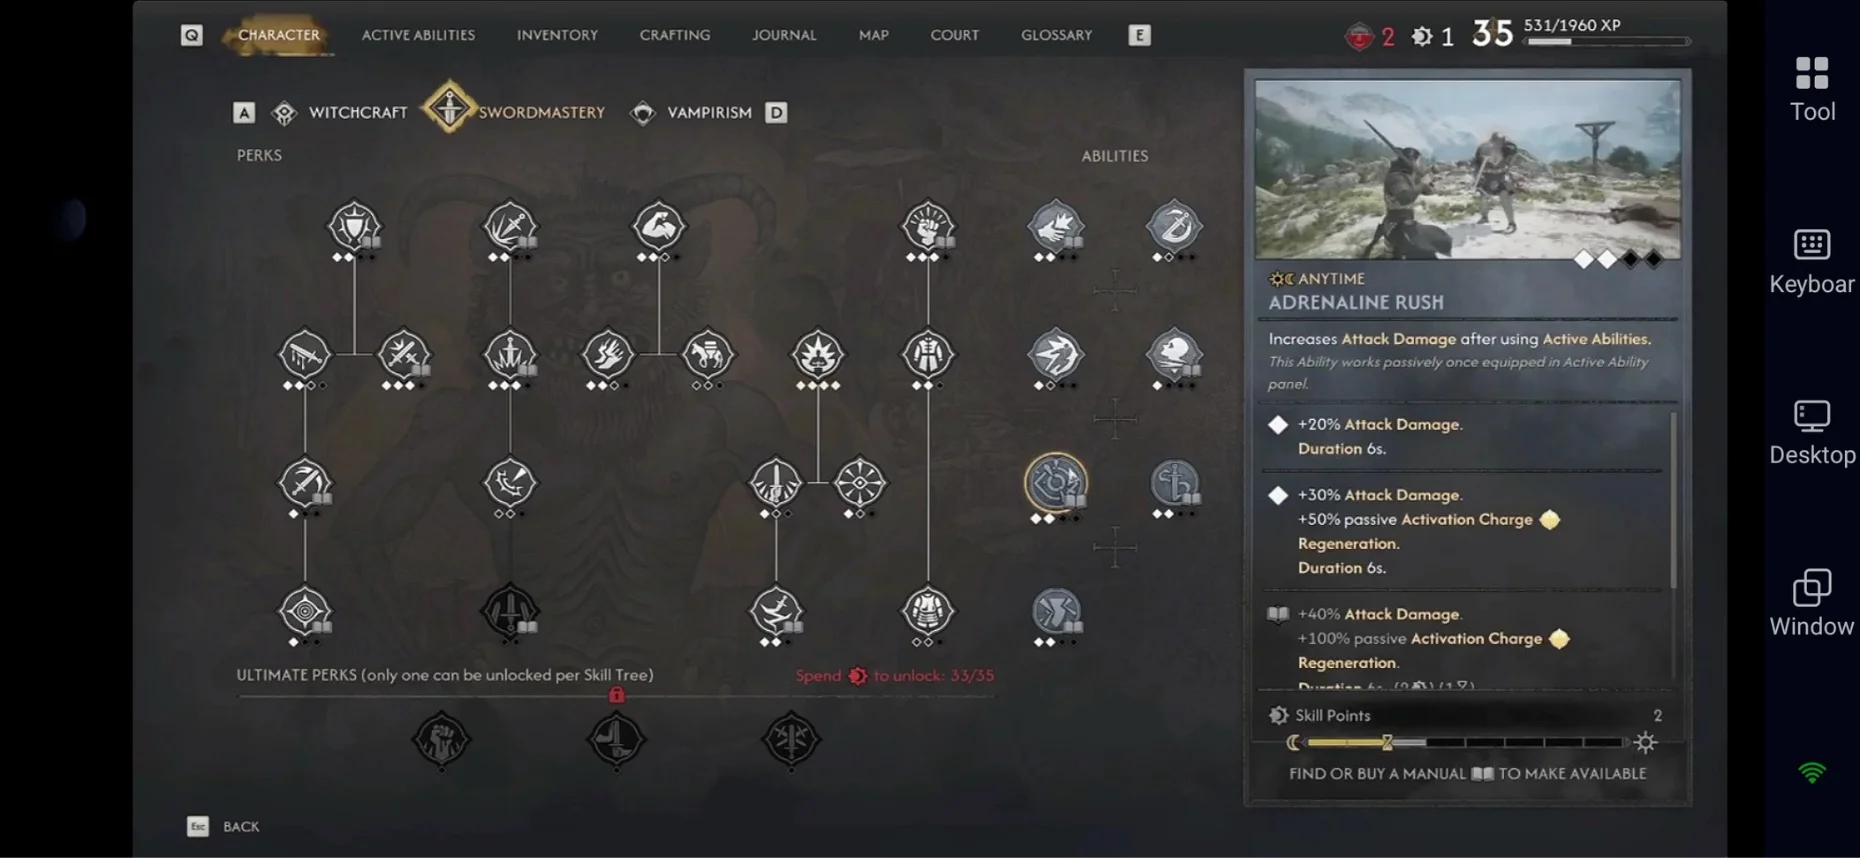
The more effectively you combine Perfect Blocks with your Active Abilities, the more value you get from this Passive.
Swiftness
Swiftness turns successful Perfect Blocks into offensive momentum. After a Perfect Block, the increased Attack Speed allows you to punish enemies more quickly, while its Critical Hit Chance bonus further improves your damage.
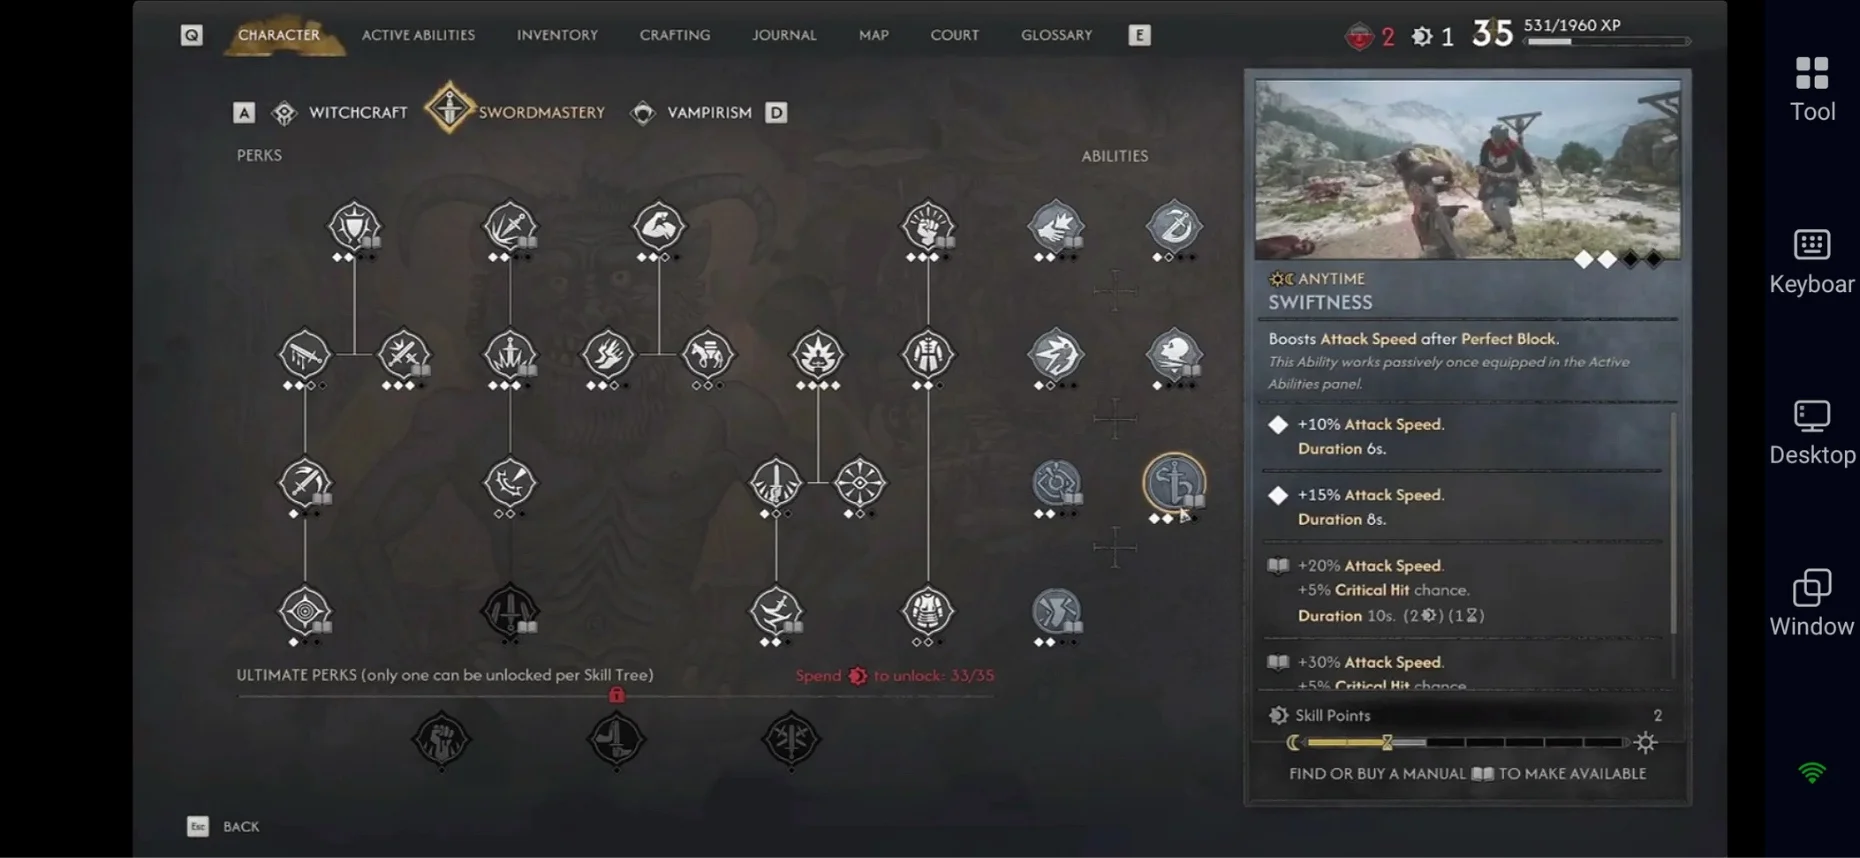
This makes Perfect Blocks valuable even when you are already comfortable defending yourself. Every successful block can become the starting point for a faster and more damaging counterattack.
Walking Fortress
Walking Fortress is another key passive for maintaining Ability uptime. Perfect Blocks restore Activation Charges while also helping reduce the cooldown of your Active Abilities.
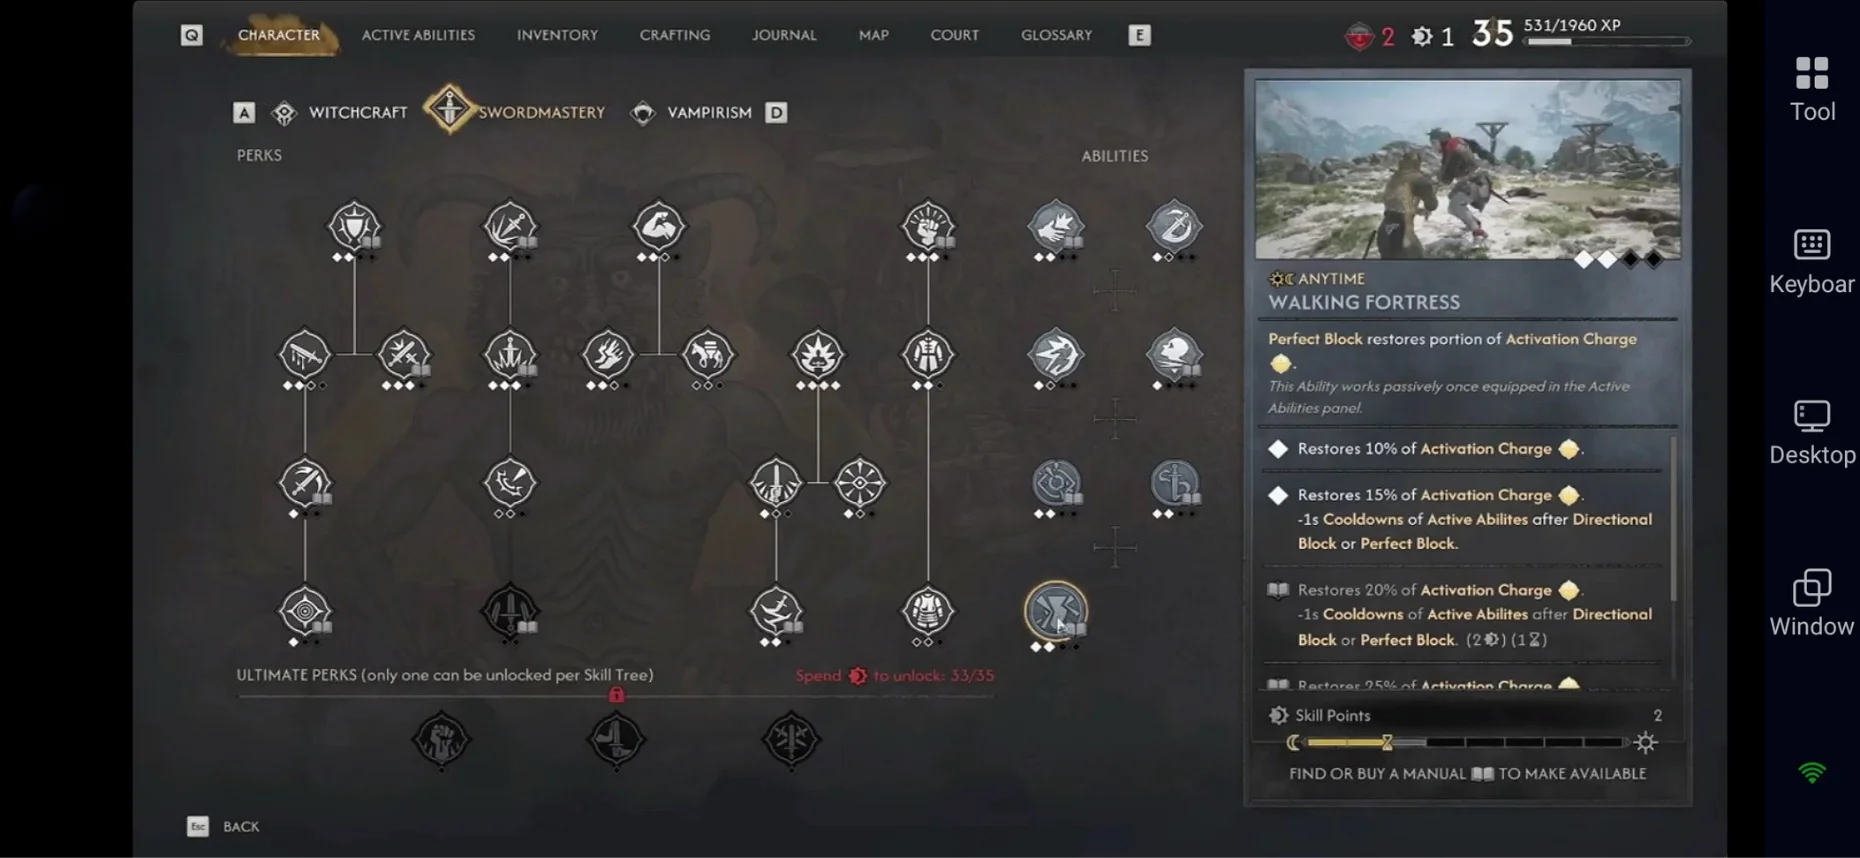
This works particularly well with the rest of the build because Perfect Blocks already form the foundation of your defensive playstyle. Instead of simply avoiding damage, you are using successful defenses to restore resources and prepare your next ability.
Dirty Trick
Dirty Trick is a strong alternative when you want a more ability-focused approach. It stuns and damages a target while making them vulnerable to Active Abilities, giving you an opportunity to follow up with a powerful attack.
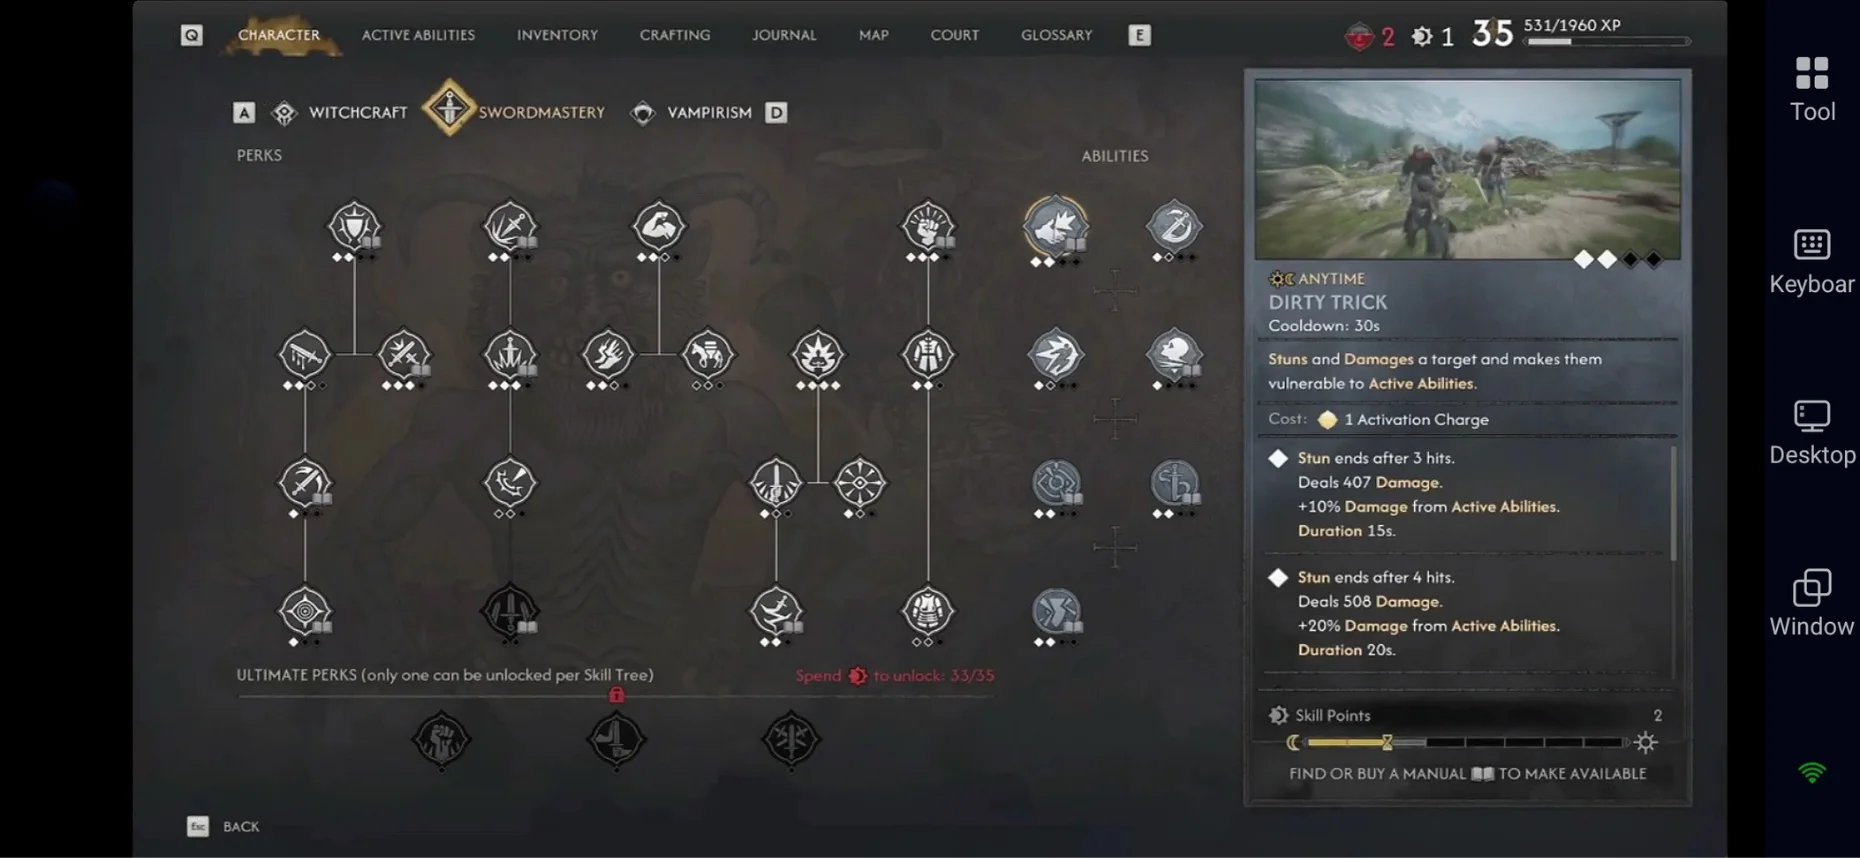
Use Dirty Trick when you want to create your own openings rather than waiting for an enemy attack. If you prefer a more traditional sword-focused playstyle, Artery Strike is generally the better choice for your main offensive slot.
Charge
Charge is useful when you need to close the distance quickly or interrupt an enemy. Its ability to stun a target also gives you a reliable opening for follow-up attacks.
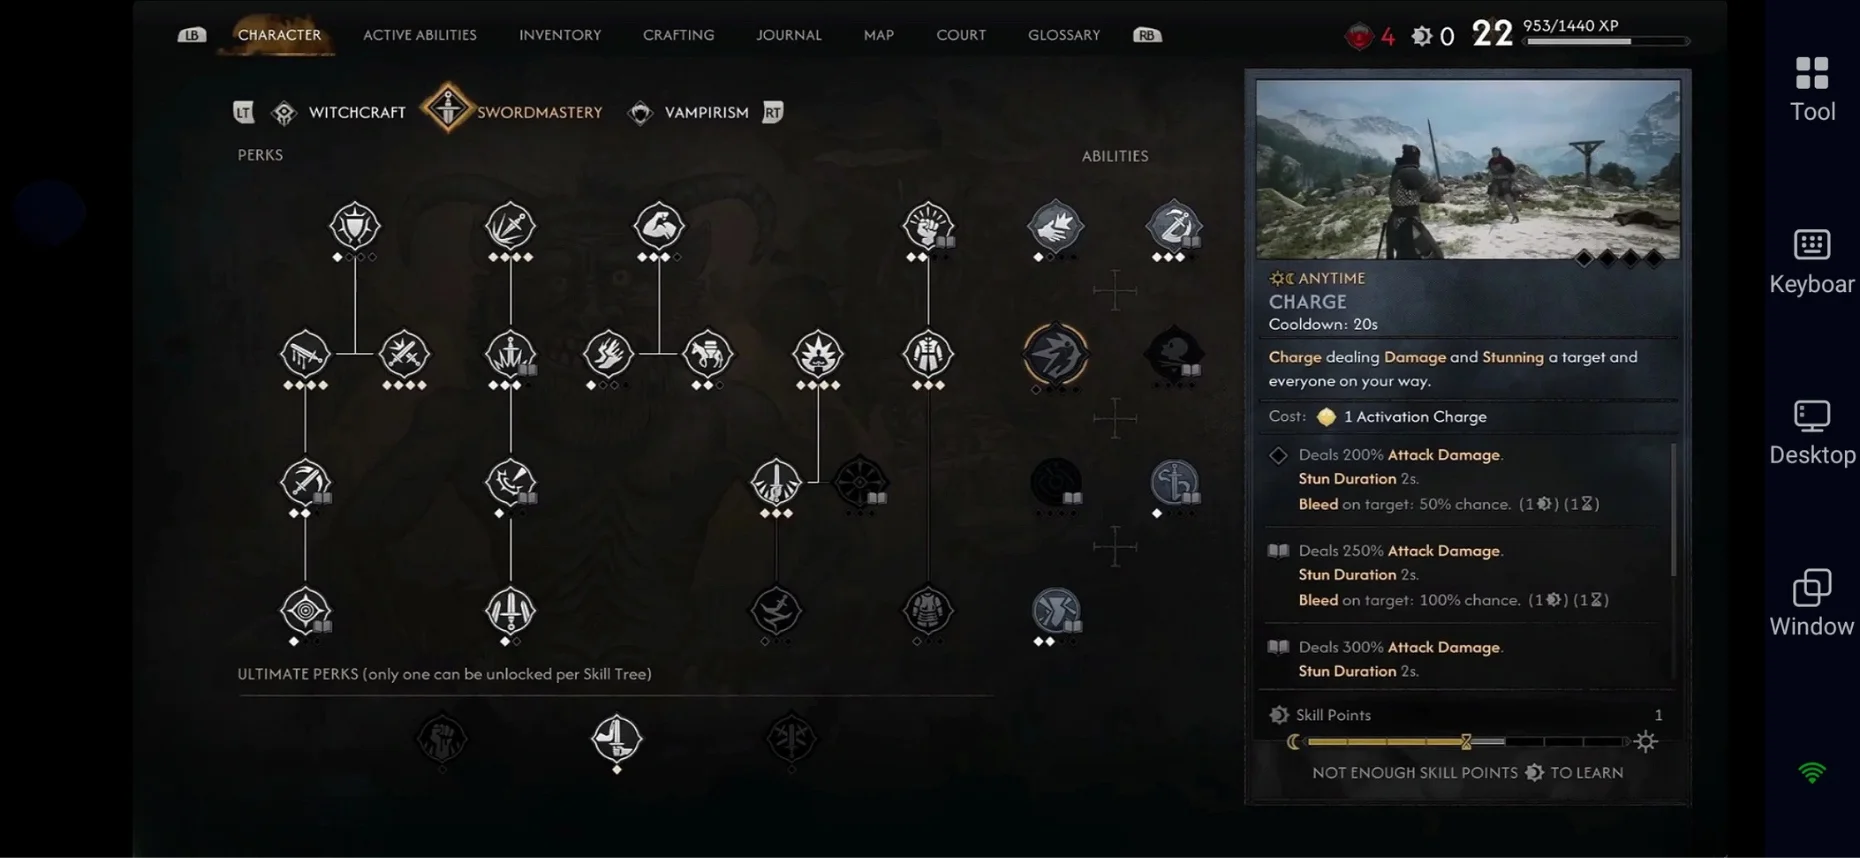
It is particularly useful against enemies that are difficult to approach safely, making it a good situational addition to the Swordmaster loadout.
Broad Swing
Broad Swing is mainly a situational choice for dealing with groups of enemies. It gives the Swordmaster some additional area damage without changing the core playstyle.
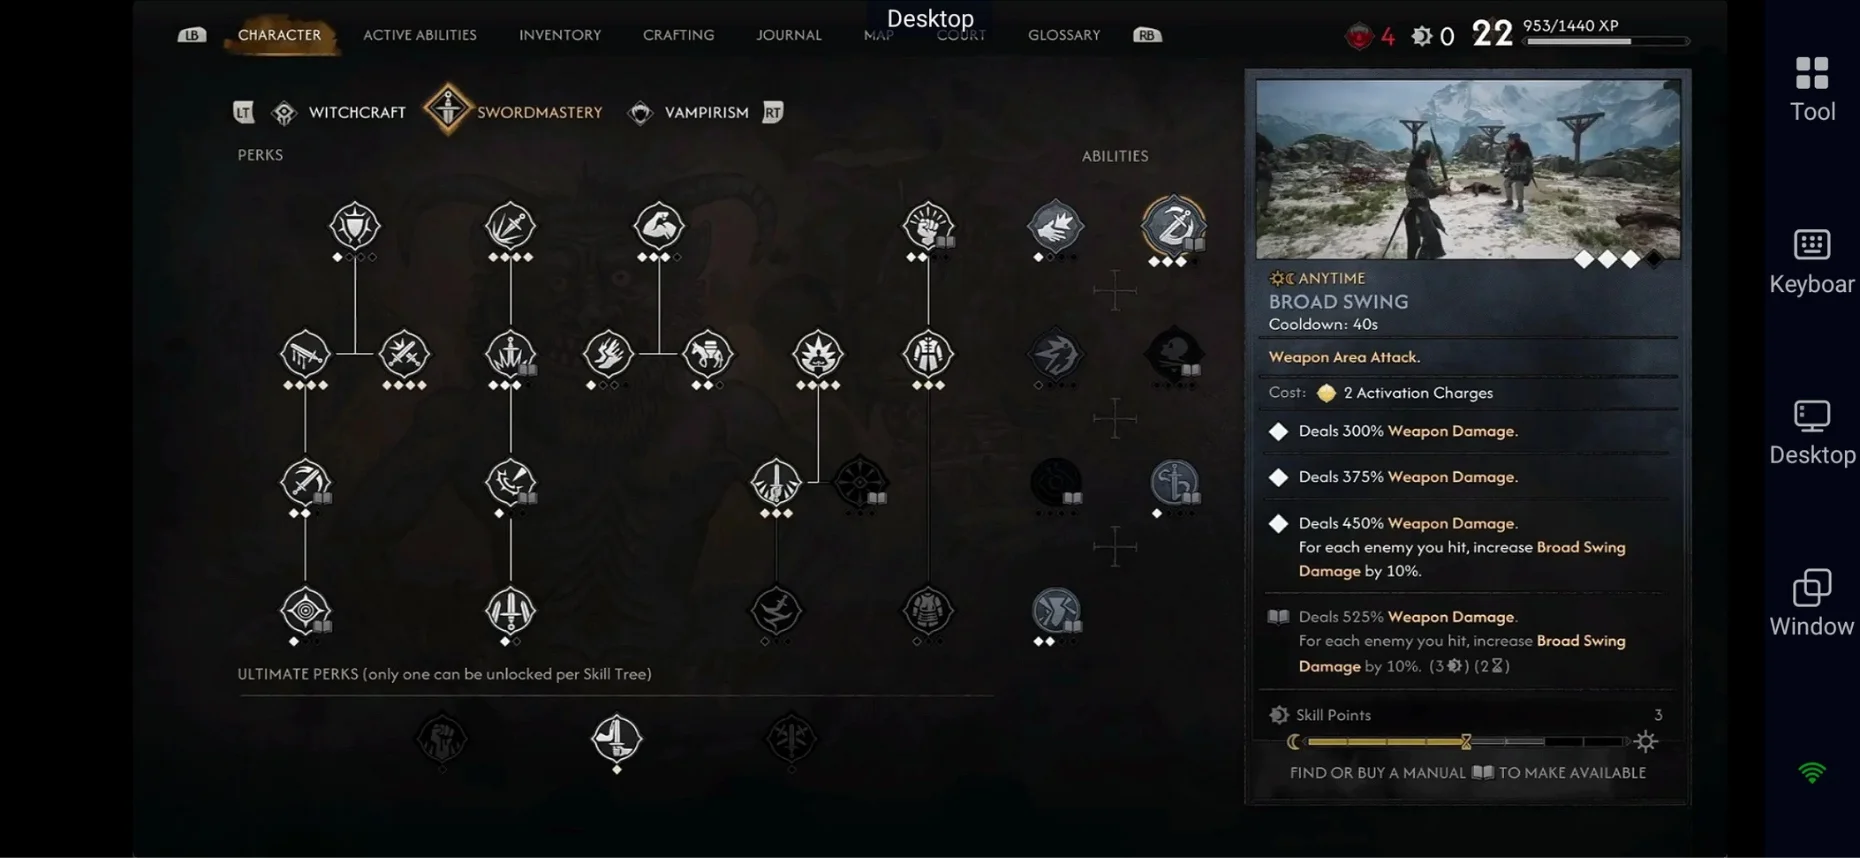
For single-target encounters, Artery Strike is generally more valuable. Consider Broad Swing when you expect to fight multiple enemies at once.
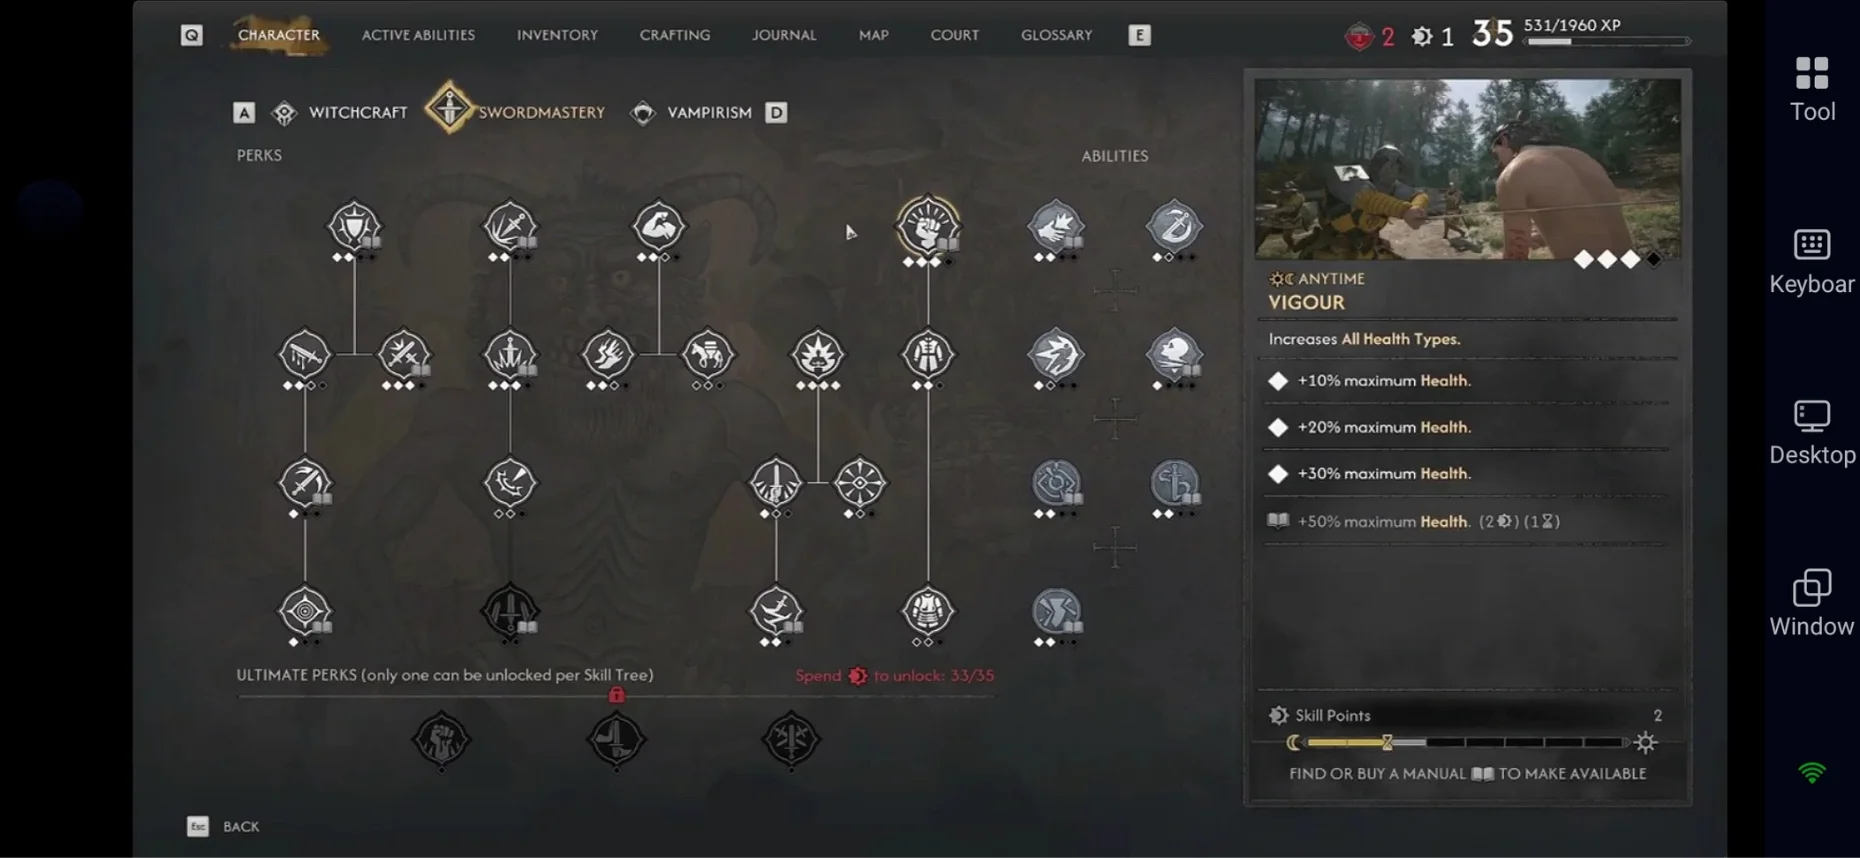
Best Swordmastery Perks
Your Perks should primarily improve Health, Stamina, Perfect Blocks, weapon damage, Critical Hits, cooldowns, and Activation Charge restoration.
|
Perk |
Priority |
Effect |
|
Vigour |
Priority |
Increases maximum Health |
|
Second Skin II |
Priority |
Reduces Heavy Armour penalties, eventually removing them at higher levels |
|
Sustained Focus |
Priority |
Increases maximum Activation Charges |
|
Master Fencer |
Priority |
Unlocks four Swordmastery Ability Slots |
|
Renewed Focus |
High |
Improves Activation Charge restoration |
|
Restless Blade |
High |
Reduces Ability cooldowns |
|
Stinging Blade |
High |
Increases weapon damage |
|
Fate's Favour |
Priority |
Increases Critical Hit Chance and damage |
|
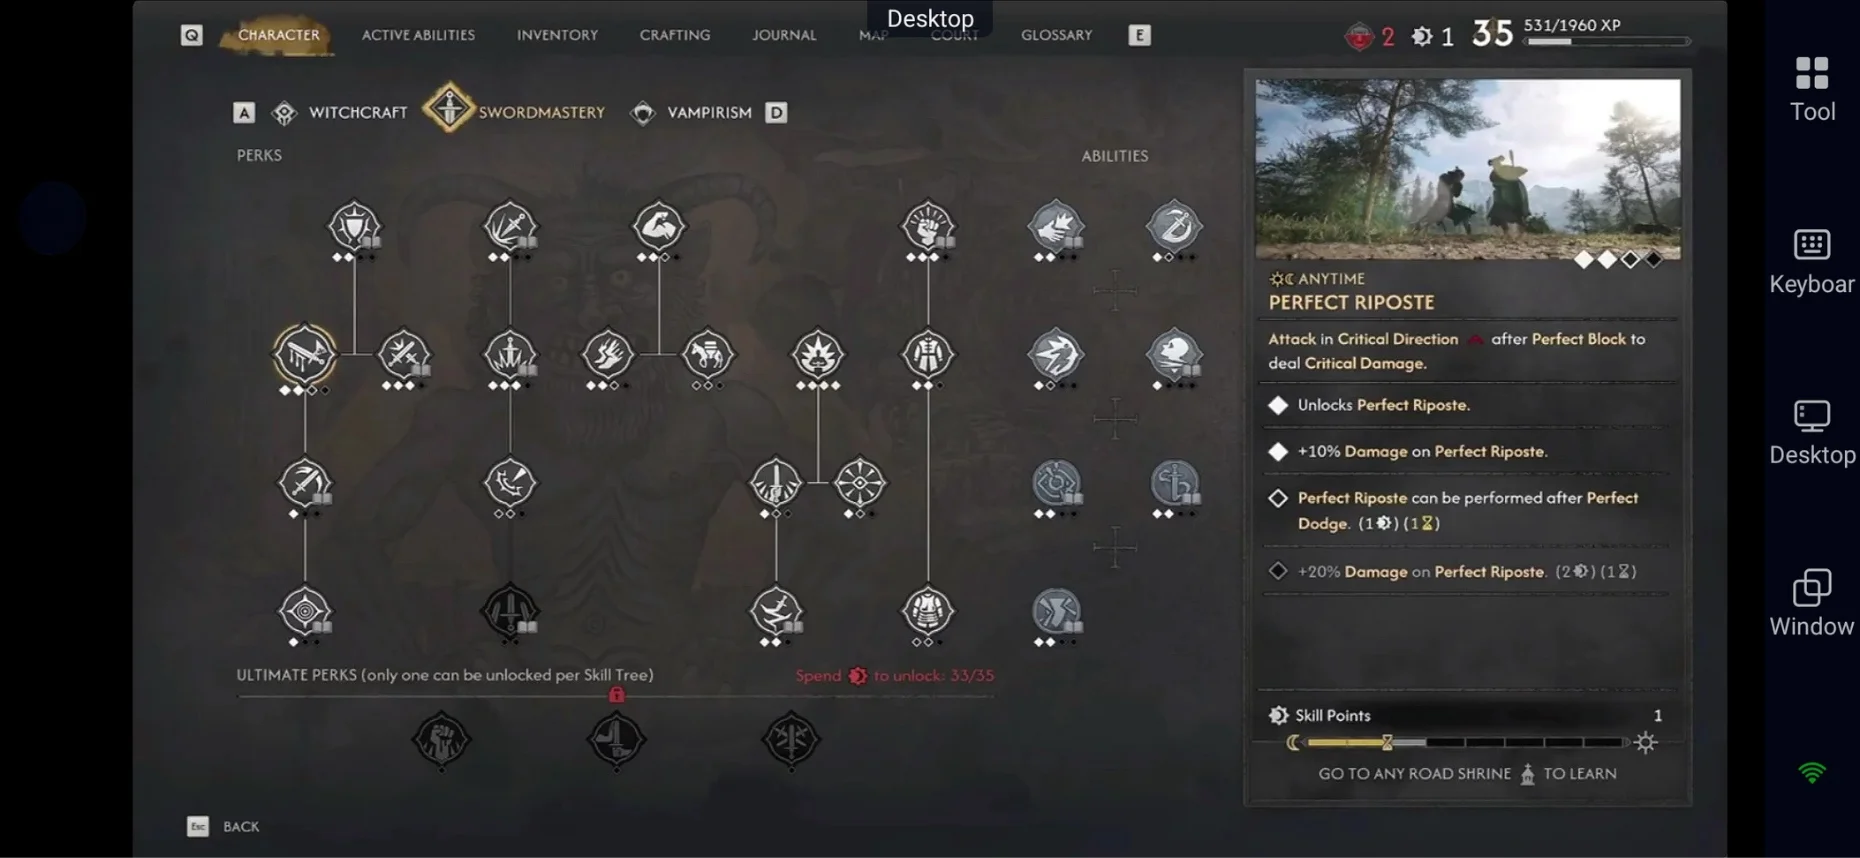
Perfect Riposte |
High |
Deals Critical damage after Perfect Blocks and Dodges |
|
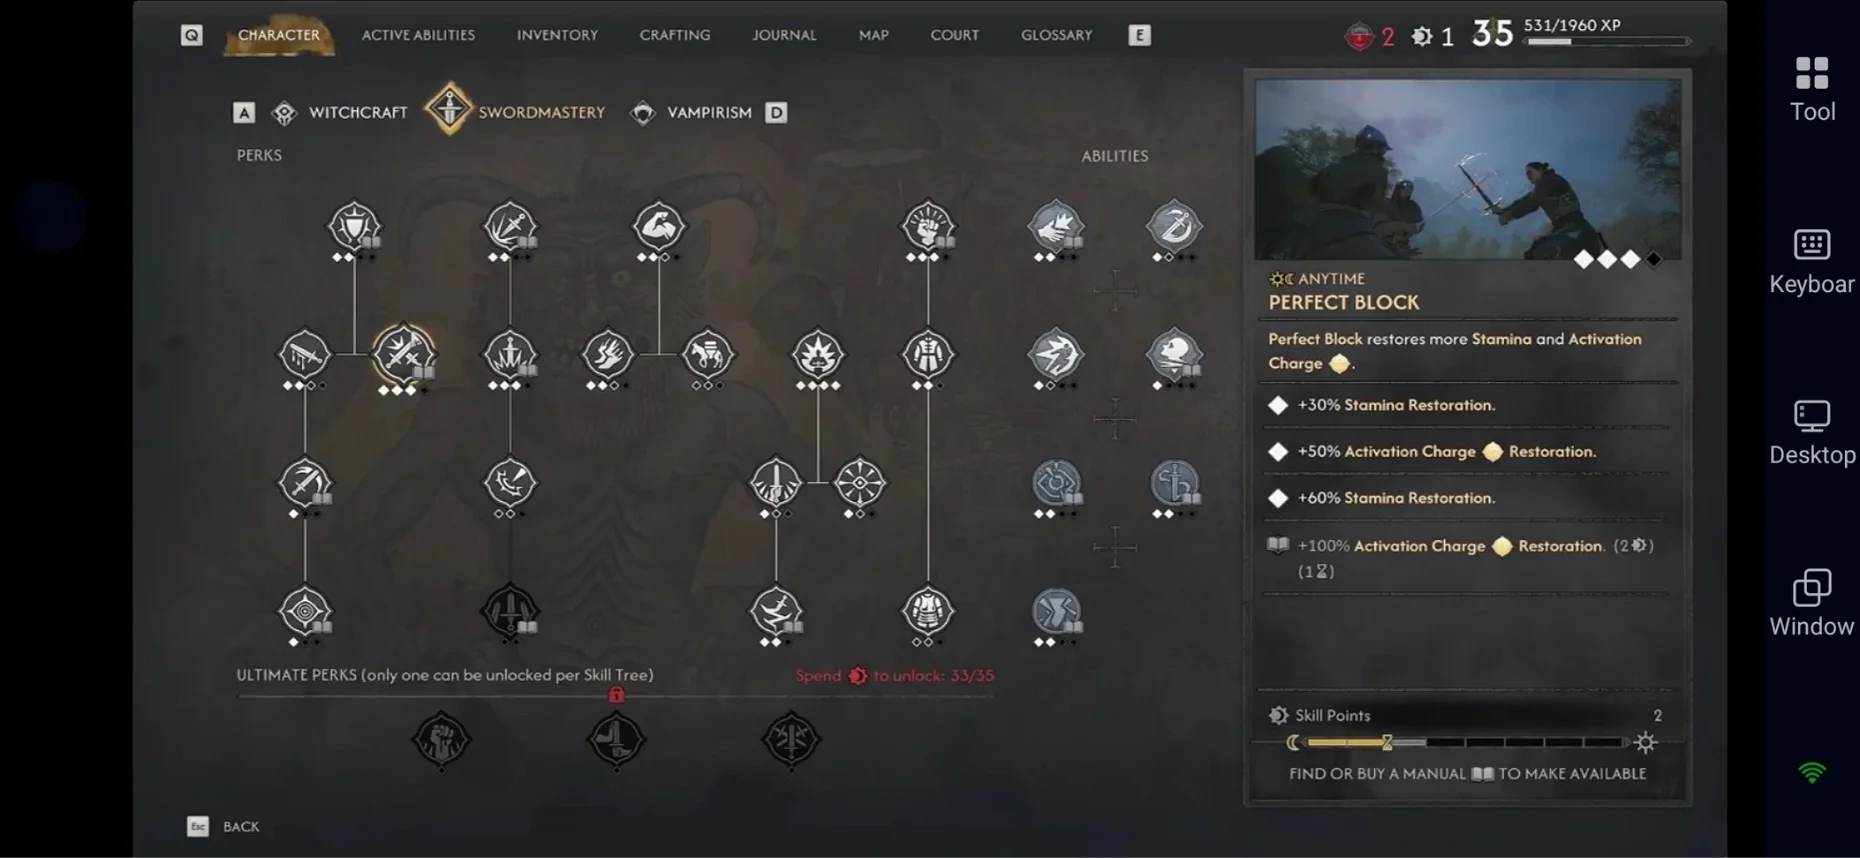
Perfect Block |
High |
Restores Stamina and Activation Charges |
|
Counterattack |
High |
Improves attacks performed after Perfect Blocks |
|
Sharp Eye |
Priority |
Chance to Weaken enemies on Perfect Block, causing them to deal less damage and receive more damage |
|
Endless Effort |
Priority |
Increases Stamina |
|
Fleet of Foot |
Medium |
Reduces the Stamina cost of Dodging |
|
Growing Momentum |
Medium |
Increases Weapon Damage with each consecutive Attack; the bonus resets when you take damage |
|
Omniblock |
Medium |
Reduces the Stamina cost of Omniblock |

 Pre-set Keymaps for Easy Play

Best Swordmaster Stats
Once your core Perks are in place, your gear should reinforce the mechanics that make the Swordmaster build work. Prioritize stats that improve Perfect Blocks, Activation Charge generation, stamina efficiency, and weapon damage.
You do not need to stack every offensive stat at once. The goal is to make your Perfect Blocks more reliable while keeping enough resources to continue attacking and using Swordmastery Abilities throughout longer fights.
Perfect Block Window
Perfect Block Window is one of the most valuable defensive stats for this build because so much of your resource generation and counterattack potential depends on landing successful Perfect Blocks.
A larger Perfect Block Window gives you more room to react to incoming attacks, making it easier to trigger effects such as Perfect Riposte, Counterattack, Swiftness, and Walking Fortress. If you are still learning enemy attack patterns, this stat can be especially valuable.
Activation Charge Restoration
Activation Charge Restoration is another major priority because your strongest Swordmastery Abilities depend on having enough Charges available.
Look for bonuses that help restore Activation Charges through combat, particularly effects tied to attacks, Blocks, and Perfect Blocks. The more consistently you can rebuild your Charges, the more frequently you can use powerful Active Abilities without having to wait for your resources to recover.
Critical Hit Chance and Damage
Critical Hit Chance and Critical Hit Damage provide the main offensive boost for a damage-focused Swordmaster setup.
Critical Hits become even more valuable when combined with your other offensive effects and Perks, allowing successful counterattacks and fast sword combos to deal significantly more damage. Once your Perfect Block and Activation Charge priorities are covered, these stats are strong choices for increasing your overall damage.
Weapon Damage and Stamina Efficiency
Weapon Damage is a straightforward way to improve your sword attacks and abilities that scale with your weapon. It becomes particularly valuable once your defensive and resource-generation mechanics are already established.
Attack Stamina Cost is also worth prioritizing because stamina controls how aggressively you can attack, dodge, and defend. Lower stamina costs let you maintain pressure without leaving yourself unable to react to the next enemy attack.
Best Equipment for the Swordmaster Build
The best Swordmaster equipment should support the same core loop as your Perks and abilities: Perfect Block → resource generation → counterattack → Ability use.
Your weapon is especially important, so prioritize swords or longswords with bonuses that improve damage, stamina efficiency, Perfect Block reliability, or Swordmastery Ability uptime.
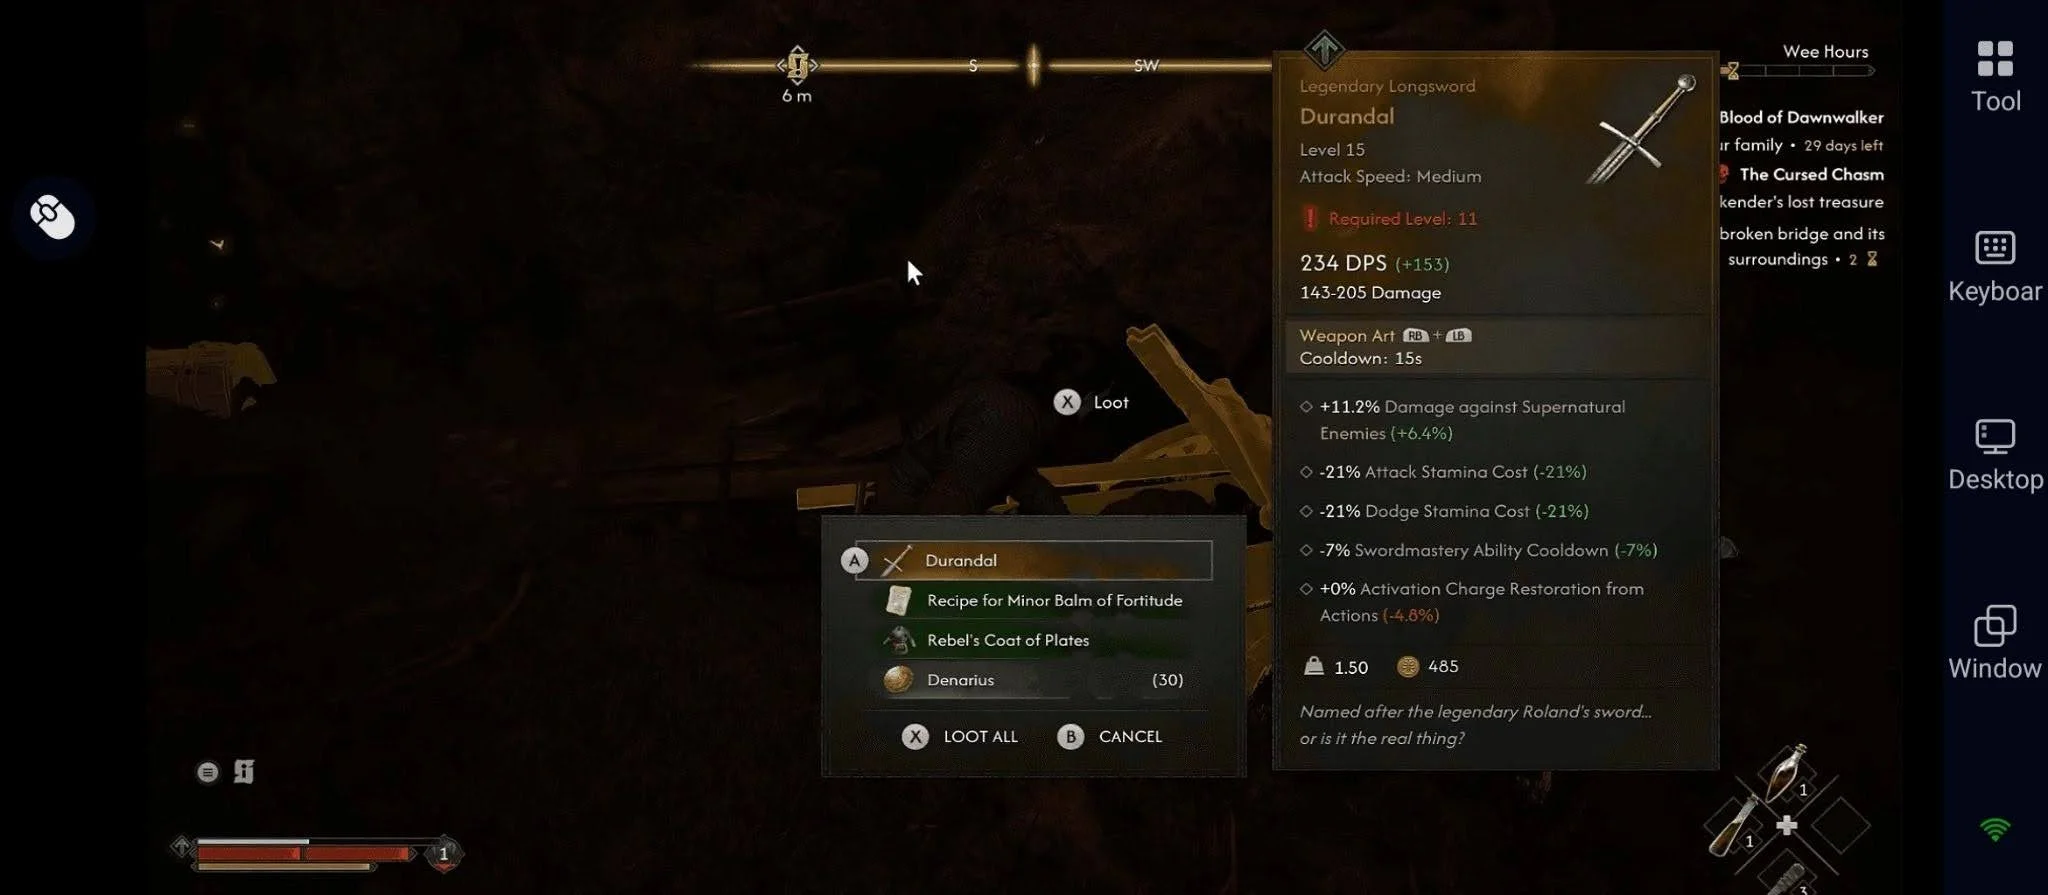
Durandal
Durandal is an excellent early-to-mid-game Legendary weapon for this build. Its bonuses complement the Swordmaster playstyle by improving damage against supernatural enemies while reducing Attack and Dodge Stamina costs and Swordmastery Ability cooldowns.
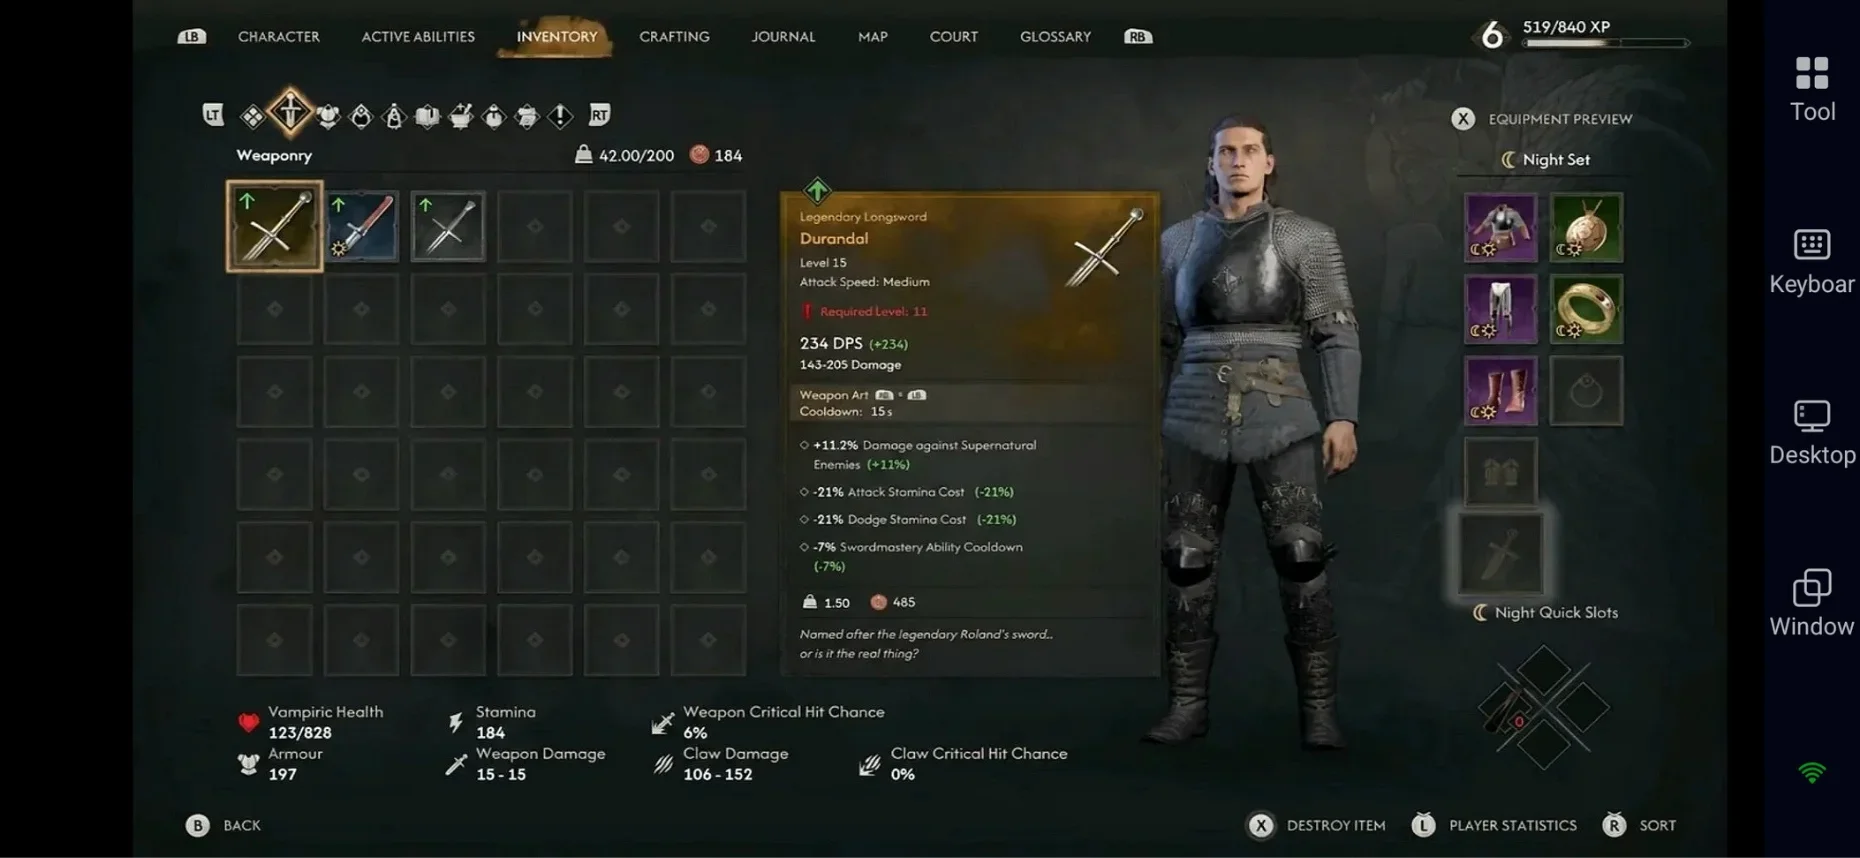
This combination makes Durandal particularly useful while you are building toward a more complete Swordmaster setup. It improves both combat efficiency and Ability uptime without requiring you to change the way the build is played.
Choosing a Later Sword
As you progress further into the game, you can replace Durandal with weapons that better match your final build. When comparing swords, prioritize bonuses such as:
-
Perfect Block Window
-
Swordmastery Ability Cooldown
-
Attack Stamina Cost
-
Weapon Damage
-
Critical Hit Chance
-
Critical Hit Damage
You do not necessarily need every bonus on a single weapon. Instead, look for a combination that complements the rest of your gear and fills whatever weakness your current setup has.
A sword or longsword should remain your default weapon if you want to maintain the fast, fencing-focused combat style that defines the Swordmaster build.
Best Swordmaster Armor and Gear
Your armor should complement your Perfect Block and Activation Charge setup rather than simply stacking raw defense.
Good pieces to consider include:
-
Ancient Hero's Armour – useful for Health restoration and damage against supernatural enemies.
-
Ancient Hero's Vambraces – another strong option for the same general setup.
-
Hunter's Trousers – provides Critical Hit Chance and Activation Charge restoration.
-
Lizard Skin Loafers – improves Critical Hit Damage and Health.
-
Pieter's Garb – particularly useful when upgraded later in the game.
-
Mercenary's Boots – another useful gear option.
-
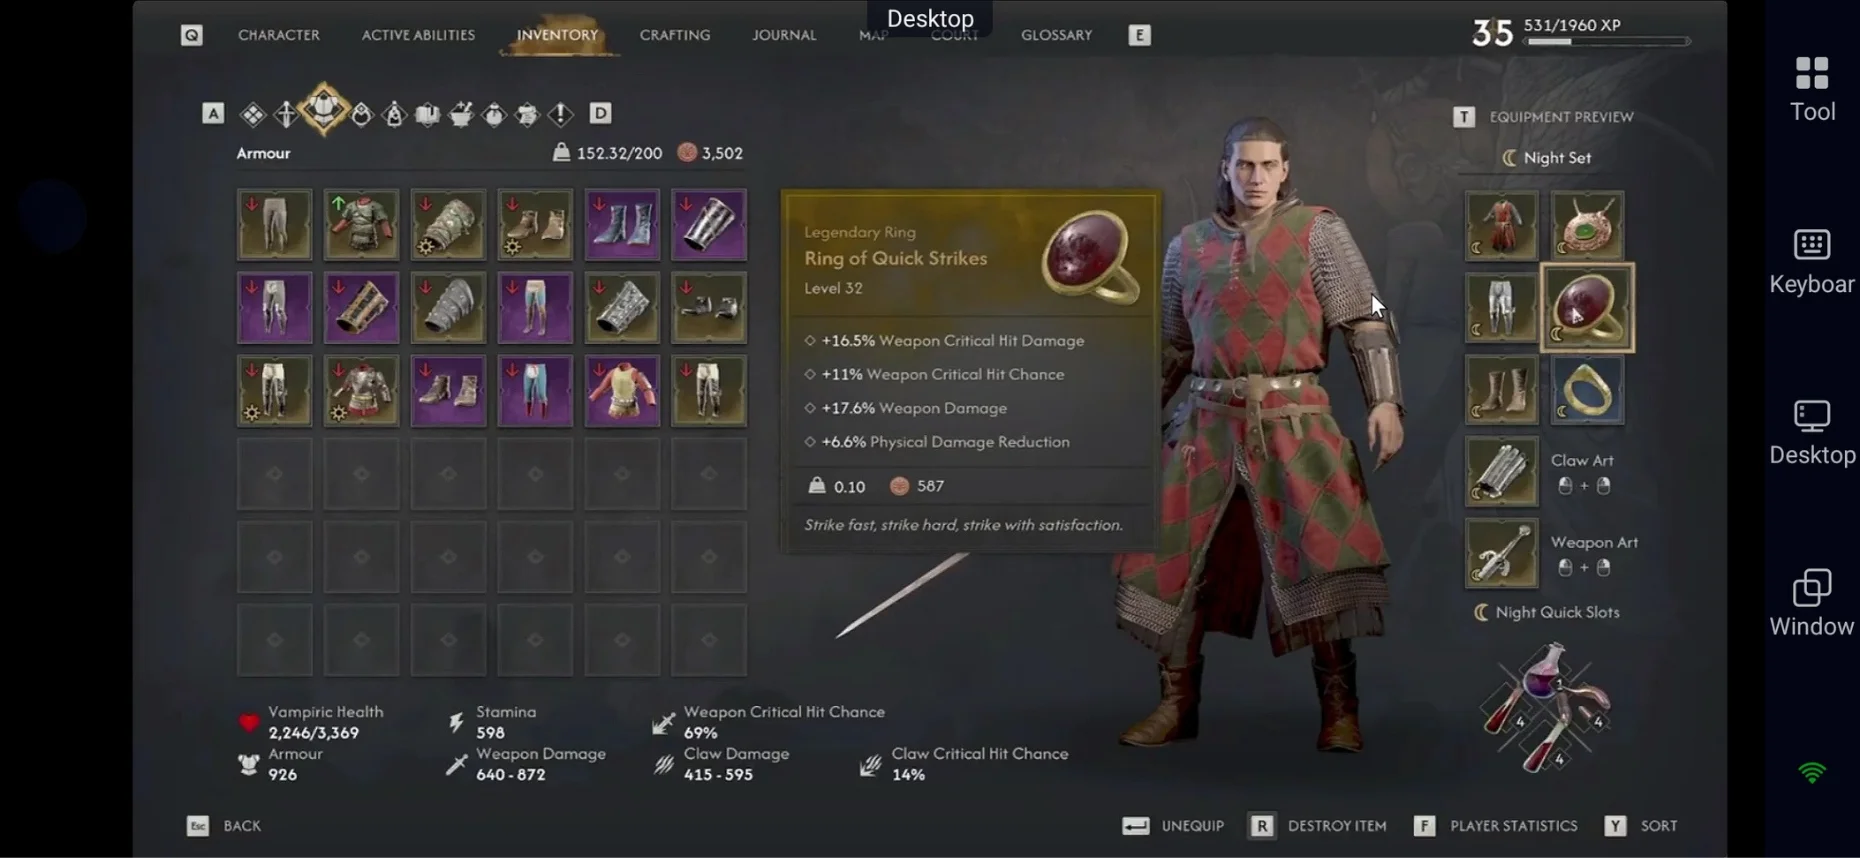
Ring of Quick Strikes – useful for a faster offensive setup.
Swordmaster Build Progression
Your priorities change as you unlock more Swordmastery nodes, so the best way to develop this build is to build its core mechanics first and then gradually add damage and Ability uptime.
You do not need to unlock every recommended Perk or Ability immediately. Start with the tools that make Perfect Blocks, stamina management, and counterattacks reliable, then build toward stronger damage and Activation Charge generation as you progress.
Early Game
In the early game, focus on establishing the defensive foundation of the Swordmaster build. Your goal is to become comfortable with directional blocking and Perfect Blocks while having enough Stamina to attack, dodge, and defend consistently.
Prioritize:
-
Perfect Block
-
Perfect Riposte
-
Counterattack
-
Sustained Focus
-
Endless Effort
-
Stinging Blade
-
Master Fencer
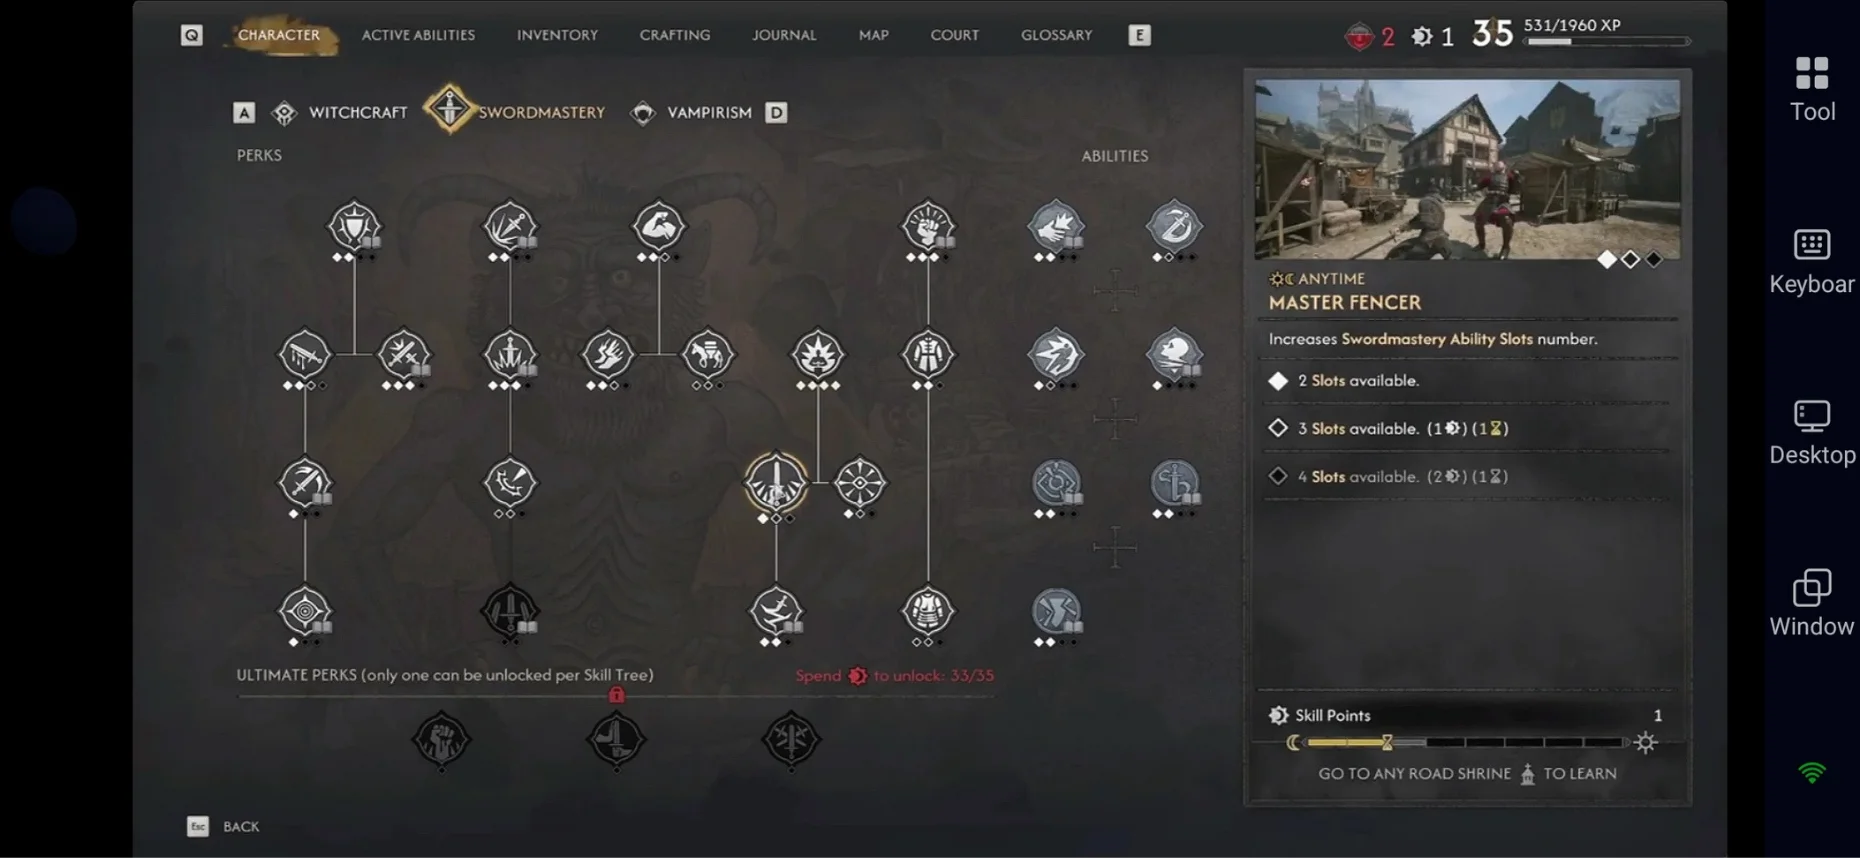
These choices give you a strong foundation without requiring a complicated Ability rotation. Once you become comfortable reading enemy attacks and landing Perfect Blocks consistently, the rest of the build becomes much easier to develop.
Mid Game
Once your defensive foundation is established, start investing more heavily into damage and Ability uptime. This is where the build begins to transition from simply reacting to enemy attacks into using Perfect Blocks to fuel your own offense.
Focus on:
-
Artery Strike
-
Swiftness
-
Adrenaline Rush
-
Walking Fortress
-
Sharp Eye
-
Fate's Favour
-
Restless Blade
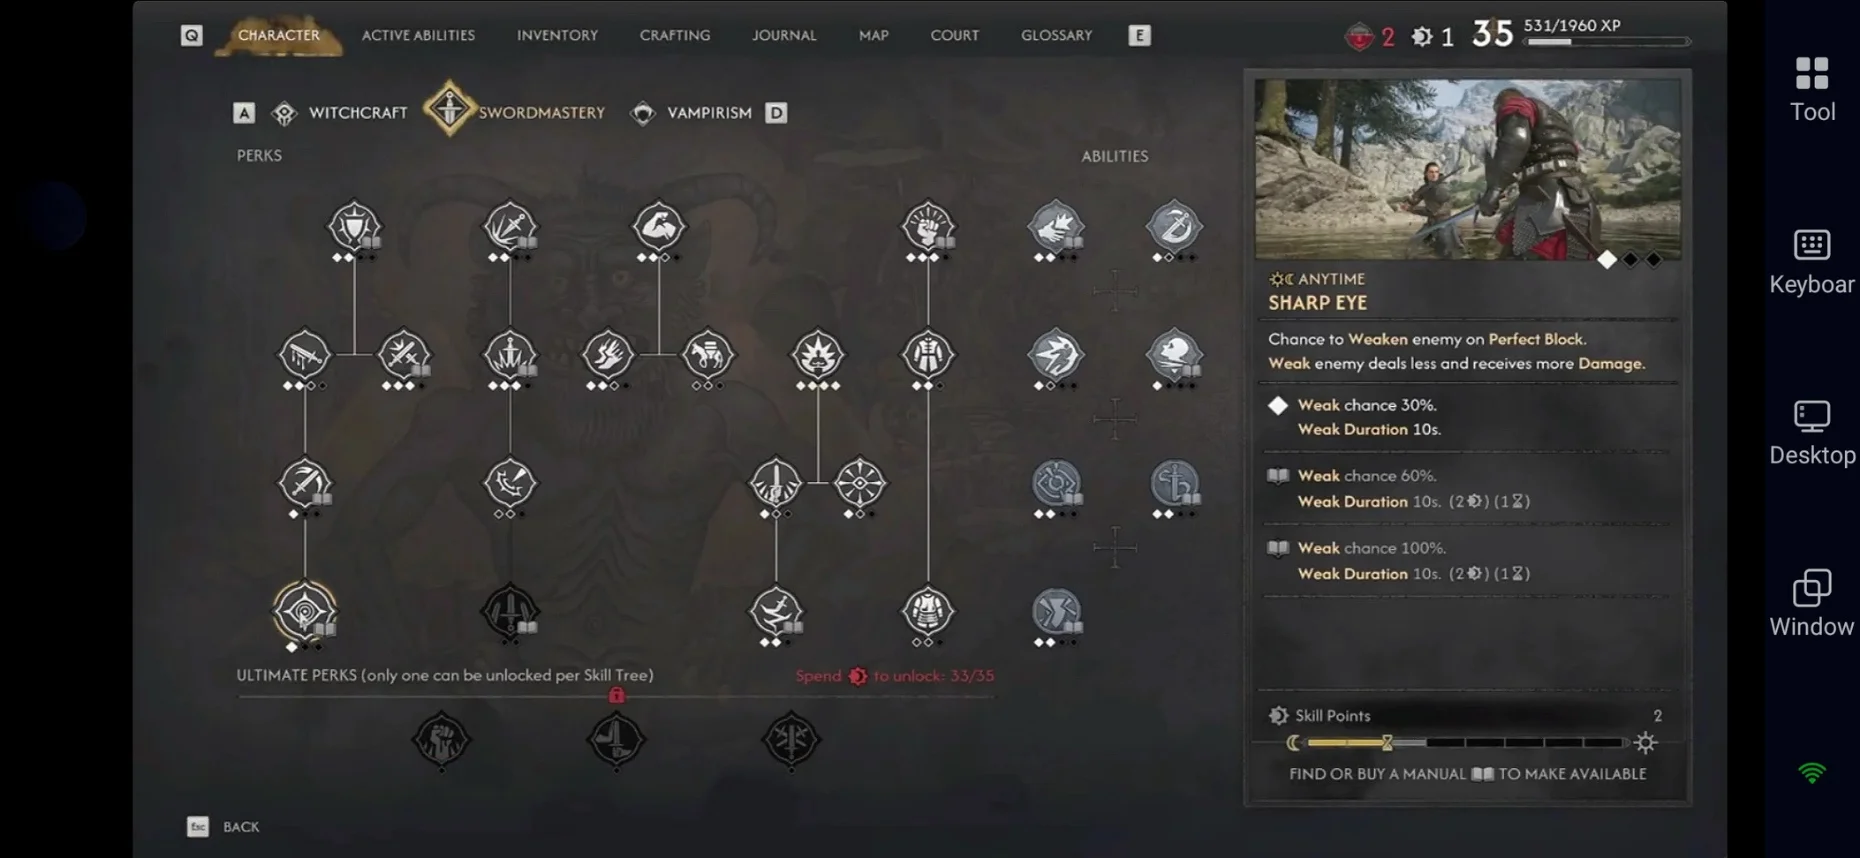
Artery Strike gives you a powerful finisher, while Swiftness, Adrenaline Rush, and Walking Fortress strengthen the connection between Perfect Blocks, damage, and Activation Charge generation.
At this stage, you should be able to move between normal sword attacks, Perfect Blocks, counterattacks, and Active Abilities without constantly running out of resources.
Late Game
By the late game, the goal is to maximize the complete Swordmaster combat loop: Perfect Block, restore resources, counterattack, use your strongest Ability, and repeat.
A strong endgame setup can revolve around:
-
Sword Sage
-
Artery Strike – Level 3–4
-
Dirty Trick – Level 3
-
Swiftness
-
Adrenaline Rush
-
Sharp Eye
-
Growing Momentum
-
Restless Blade
-
Perfect Block
-
Master Fencer
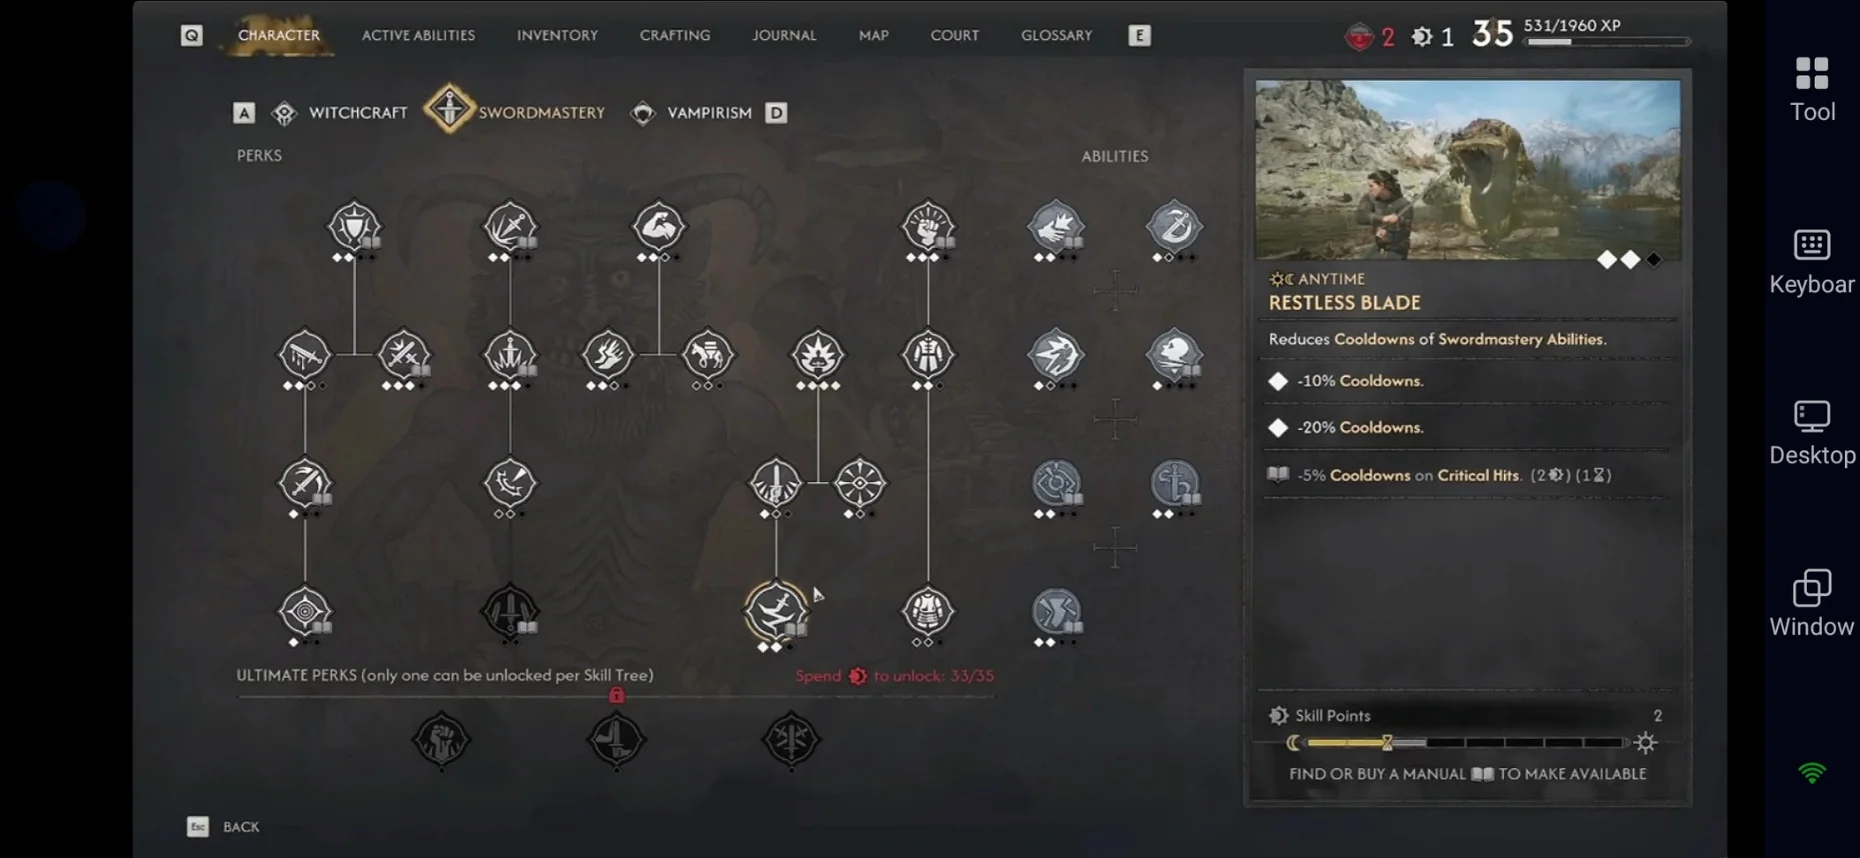
At this point, your build should have enough Perfect Block support and Activation Charge generation to maintain a much more aggressive Ability rotation. Sword Sage becomes particularly valuable in larger encounters, while Artery Strike provides a powerful finisher against vulnerable targets.
The late-game setup is less about adding more individual sources of damage and more about making every part of the build work together. Successful Perfect Blocks create openings and restore resources, while your Perks and gear help you turn those openings into faster attacks, Critical Hits, and more frequent Abilities.
Swordmaster Build Tips
A few simple habits can make The Blood of Dawnwalker Swordmaster build much easier to use. Focus on your timing, manage your Stamina, and make the most of your Perfect Blocks instead of constantly attacking. Keep these simple tips in mind to get the most out of your Swordmaster playstyle:
-
Master Perfect Blocks: They give you openings while restoring Stamina and Activation Charges.
-
Watch your Stamina: Keep some Stamina available for blocking and dodging.
-
Use abilities wisely: Combine your sword attacks with skills like Charge and Artery Strike.
-
Build Activation Charges: Charge restoration lets you use your strongest abilities more often.
-
Use Sword Sage against groups: Its cooldown resets can help you chain abilities after getting kills.
-
Keep your gear focused: Prioritize Perfect Block Window, Ability cooldown, and Activation Charge restoration.
-
Add a few extra abilities: Witchcraft or Vampirism can give you useful utility without changing your main Swordmaster playstyle.
Should You Use the Swordmaster Build?
The Swordmaster build is a great choice if you enjoy fast sword combat, Perfect Blocks, and close-range duels. It gives you a reliable playstyle that works during both day and night without depending too heavily on Witchcraft or Vampirism.
If you enjoy learning enemy attack patterns and timing your blocks and counterattacks, this build is worth trying. The Blood of Dawnwalker Swordmaster build also gives you plenty of flexibility, letting you add a few Witchcraft or Vampirism abilities when you need extra utility.
Conclusion
With this The Blood of Dawnwalker Swordmaster build, you can build Coen around precise defense, fast sword attacks, and powerful counterattacks. Focus on Perfect Blocks, Stamina, and Activation Charge restoration, then refine your Perks and gear as you progress to keep the combat loop flowing. As you continue mastering the Swordmaster playstyle, OSLink lets you remotely play your The Blood of Dawnwalker PC session directly from your mobile, so you can keep practicing your Perfect Blocks and refining your build even when you're away from your PC.
 Download